Twin D-500 Restore-a-Thon / Full-Comp WOPL upgrade (+ first a PL 400 S2 WOPLing / Proof of concept / Process debug )

Glen,

The other evening I started this conversation with NavLinear. I'm going to PM him this photo and ask for 3+ amplifiers worth!

Again, thanks for the 'tested-good' solutions!!!

3D
Ok
But that was an order for filling shorts in my rack not amp specific
I am sure Dennis knows what you’l need
 
I used to use silver bearing solder and learned old fashioned 60-40 (or eutectic) is fine. Rosin core is fine (just clean up), and, oddly enough, is exactly what everyone else was using since fish first grew legs and stared walking.

Aircraft are a different animal, and pretty much always Teflon coated wire that can take the heat of high-silver content solder.

In audio gear, you need to be mindful of the heat input on your components. You’re not soldering to Amphenol connectors; your going straight to components and the big ones already need 80+ watts to get hot enough.
 
The company I used to work for uses Amphenols quite heavily. I’ve soldered about half my weight in the things now…

Tricks like starting at the bottom; NOT on pin A, are the gems that make life less miserable.

Newer ones have the pins molded to the insulator, and lose pins don’t happen. But bent pins require full replacement.

The gear I repair was made by my former employer in the early 70’s and are still going (somewhat) strong. Purchasing complains when I need to order ancient NOS parts from eBay, but when I remind them the old one lasted nearly 50 years, they calm down.
 
Yeah, skip the silver solder. I worked in the board/connector repair for many years in the Navy and we used 63/37. No Silver Solder allowed and we worked on AC all the way up to the FA-18's. Fighters, Bombers, Jammers etc..... It was all treated the same. Even the current crop of UAV's didn't use silver solder. Just an unnecessary expense.

I no longer use the Rosin Core due to the intense scrubbing cleaning needed when building complete boards but use it if I just have to do a quick repair.
 
3D,
Welcome to the WOPL assembly adventure. The quality and straightforward design of the boards and overall design will continue to impress you. My personal experience with Joe's kits has been sheer joy, you will have many more of those "Wow: moments as you assemble the kits.......leading up to my favorite, kicking back and listening to the completed amplifier. I have had Phase Linear components since 1978, and they always sounded fantastic. The WOPL's version is honestly in a class by itself. You will truly enjoy the assembly, testing, and the final project. Joe has thought the entire design out, tested and proven the design..........truly.........."always making it better".
Enjoy your journey with WOPL, it sets the standard!
 
Perry,

I was able to nail it down a little closer, but not exact.

Here's the latest I found the old school meters:

View attachment 62682
('61 Catalog)

And here's the earliest that I found the space age (rectangular) meter look:

View attachment 62683
('73 Catalog)

Note: It was hard to find much of any official Variac documentation from the late '60s? (Back then, did all the technical writers hop into a VW microbus, drive out to San Francisco, and hang out with Jefferson Airplane at Haight-Ashbury?)

So, instead of '48-'80, we now know that it happened at some point between the photos above. The cool thing? 50+ years from now both your Variac & mine should still be 100% ready for troubleshooting duty. I've worked with some Brits, and they would say that Variac made some really solid kit.

FWIW,

3D
I guess mine is a newer type 2E556218-A86D-4DC2-A560-478AD17D5417.jpeg
 
Perry,

I was able to nail it down a little closer, but not exact.

Here's the latest I found the old school meters:

View attachment 62682
('61 Catalog)

And here's the earliest that I found the space age (rectangular) meter look:

View attachment 62683
('73 Catalog)

Note: It was hard to find much of any official Variac documentation from the late '60s? (Back then, did all the technical writers hop into a VW microbus, drive out to San Francisco, and hang out with Jefferson Airplane at Haight-Ashbury?)

So, instead of '48-'80, we now know that it happened at some point between the photos above. The cool thing? 50+ years from now both your Variac & mine should still be 100% ready for troubleshooting duty. I've worked with some Brits, and they would opine that Variac made some really solid kit.

FWIW --

3D


Yeah, we had that document listed in the Variac thread.

https://forums.phxaudiotape.com/threads/variacs-n-stuff.9022/#post-244175
 
Glen,

Looking at your photo, I believe that the number "7726" = a July '77 date code for the transformer. This would be in agreement with the '73 photo in the Variac catalog showing the 'space age' update vs the original cool-looking post-WWII meters in Perry's Variac:

View attachment 62685
( YYWW Variac date format)

Q: On 2nd glance, is this opened up autotransformer the same unit as the metered Variac you just posted? The internals look a bit different than mine. If this is your backup autotransformer, then when you get a chance go ahead & take the back off of your metered Variac and snag a photo of that date code...and then we'll know for sure.

...anyway, these things are all definitely Industrial Strength stuff. I just hope that whoever gets mine after I'm gone appreciates it as much as I do. :0)
No It’s not triple D. That’s a 30 amp Variac I started to put in a case. It sits unfinished but may soon find a home on my bench To go with the DBT I just completed
 
For those interested, look up GE amp and volt meters on eBay. You can get decent ones (some new in box) for under $20 if you're doing a home-brew.

I just had to find one yesterday for a piece of equipment.

AC and DC with various ranges available.
 
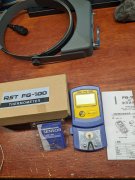
Let me speak from experience with Hakko 470 desoldering stations. Make sure it's properly calibrated. For pcb through hole work I use 700 deg F. max and no more. This is the lowest setting on my units. Get up to 750 F and the trace may loose adhesion to the board.
The genuine Hakko tip thermometers are very expensive, but the photo shows a cheap clone that uses genuine Hakko sensors. I think it works excellent.
Also, if you work on more modern boards with lead free solder, these units do not work well. The trick is to melt leaded solder into the joint first, then heat and vacuum. Sometimes leaded solder needs applied twice. And, sometimes, just sacrifice the component by cutting the leads and then extracting them.
But overall, with proper technique, they are great quality tools. Any time my iron is turned on, so is the desoldering gun.
And I do still keep wick at hand. But, most components just drop right out. And, no damage to those old fragile vintage traces on the board.
 

Attachments

  • PXL_20220228_035009577.jpg
    PXL_20220228_035009577.jpg
    3.2 MB · Views: 9
Rule #1 is to sacrifice the component first. None of us here is going to do failure analysis on a removed part :)
I’m with Joe. I will more often than not just heat the part with a soldering iron and pull it then use the desolate vacuum iron. Relays and radial snap in capacitors are an other story
 
I use the big blue solder sucker. It pulls about 90% or more on the first shot.

I do have wick for some jobs but this is working for me now.

Same as me...... I like to see how much pressure these guys with the electric de-soldering tools apply on the pads which pushes the pads into the fiberglass boards causing damage the average dude can't repair. Nozzle size is super important. Setting new pads on a single sided board or putting through holes into a double-sided are a long process and a pain.

I use an iron, pull the component, then use the plastic solder sucker or a piece of wick.
 
  • Like
Reactions: J!m
Same as me...... I like to see how much pressure these guys with the electric de-soldering tools apply on the pads which pushes the pads into the fiberglass boards causing damage the average dude can't repair. Nozzle size is super important. Setting new pads on a single sided board or putting through holes into a double-sided are a long process and a pain.

I use an iron, pull the component, then use the plastic solder sucker or a piece of wick.

I go even further. I destroy the component, clip every lead off of the component right at the component body, get the component out of the way leaving as long a lead stub as possible protruding from the PCB. Then with tweezers and a small iron, quickly remove the lead from the board. Often the iron tip itself will pull the lead along with it.

Once the board is clean of all leads, then use the solder sucker or wick to remove the solder from the hole. Much safer for the board to do it this way.

Pulling a single lead at a time from the board is far easier than grappling with multiple leads.
 
I heat-n-suck until the ho is clean, then remove the component. Some of these boards (Kenwood, in particular) like to leave the leads long, and fold them down over the trace for a while... These are fun to wrestle with but I have a technique now (certainly not approved by, well, anyone) to deal with them without destroying everything.

Sometimes I test the old stuff, but usually not.

If I rebuild the Aragon D2A board further, I may go with Joe's method. Those single-sided boards suck, and the solder melts hot. Bad combination...
 
Used the Hakko 470 this morning to pull the resistors I put in a light board to calibrate the 400s meters for 200 watts. Then put the original resistors back in. Looking at it, can't tell it was touched.
Just have to be careful, contact the lead for heat transfer, and very lightly touch the pad. Pull the trigger, big vacuum. Don't linger on the pad. I'll never use a spring vacuum sucker again if I can help it.
For plated through holes plugged with solder but no lead, fill it with solder until it domes. Touch the dome with the Hakko, wait, pull trigger, clean hole. I'm a believer.
 
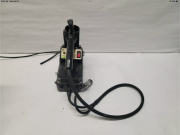
i have been following along on Triple D’s thread and not to hijack it I went on eBay to see what my desoldering station was going for. These are in the $750 range new I think. https://www.edsyn.com/product/DT/ZD500DX.html
I bought mine several years ago and would put it the 10 must have column

so I made an offer ona second one of $80 and won it. Seller said it works but parts alone worth that to me

we now hand back control of this thread41611A3E-24AB-4A1E-8BFC-9B90643AA176.pngFF777668-85D1-48C3-941F-D15547D14347.pngC6DD3AB2-8D0E-4B47-ABEA-08605B8389A5.png
 
Last edited:
Back
Top