Power transistor help

George S.

Veteran and General Yakker
Joined
Feb 18, 2020
Messages
5,026
#21
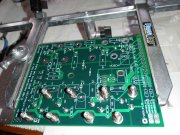
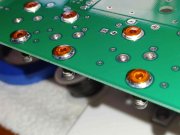
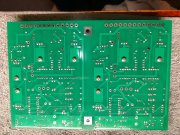
If you zoom in on the first pic, you can see the PEM's are not all the way flush.
I see what your saying. All my organic filler plugs popped out, his aren't.
So what's the best way to fix it after pulling the boards? Big heavy iron on top of the nut until the solder melts and the nut settles against the board, then add more solder to close the gaps?
I'd be thinking a old school Weller Expert pistol grip gun right on top the nut. No solder on the tip, just add as needed around the nut.
 

Gepetto

Administrator
Staff member
Joined
May 15, 2011
Messages
13,959
Location
Sterling, MA
Tagline
Old 'Arn Enthusiast
#22
I see what your saying. All my organic filler plugs popped out, his aren't.
So what's the best way to fix it after pulling the boards? Big heavy iron on top of the nut until the solder melts and the nut settles against the board, then add more solder to close the gaps?
I'd be thinking a old school Weller Expert pistol grip gun right on top the nut. No solder on the tip, just add as needed around the nut.
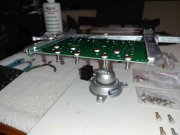
No, just reheating the PEMs with an appropriate weight dangling from them on the component side will do it...the springs are the best but it can be done just by hanging a long 6-32 SS screw with 3 or 4 nuts threaded all the way to the head will give you a good bond with the board placed flat. See the last picture for that technique. Backplane Springs 4.jpg Backplane Springs 5.jpg Backplane Springs 6.jpg IMG_6292.jpg
 
Last edited:

George S.

Veteran and General Yakker
Joined
Feb 18, 2020
Messages
5,026
#24
Hard to tell, out of focus when zooming in to look. If you have the nuts fully seated in the board, use solder wick to remove any solder on the face of the nuts that contact the nylon step washers, and alcohol to remove any flux. And run a tap through the nuts to ensure the threads are clean and a little dab of synthetic grease to lube them. No need to replace them unless you really think they're messed up bad.
 

WOPL Sniffer

Veteran and General Yakker
Joined
Aug 10, 2015
Messages
11,522
Location
Minnie-Soda
Tagline
Screw it
#25
You need to take your time. It looks like there are a couple solder tails that might touch the chassis when you put those back planes in. Trim, then trim again, and trim trim trim..... What kind of iron are you using? Flux? wattage and heat range??? If worse comes to worse, order boards that are already assembled. It costs a bit more, but that is the heart of your amp and if your soldering is not up to par, you'll risk this:


Marvin1.jpg
 

WOPL Sniffer

Veteran and General Yakker
Joined
Aug 10, 2015
Messages
11,522
Location
Minnie-Soda
Tagline
Screw it
#26
Also, after you are done soldering the PEM's use a tap and get that solder out of the threads. You'll have to reef on the screws if you dont, and then you can't tell how snug the transistors/SilPads are causing you MORE headaches.

I have a flat piece of heavy MDF with a sheet of 600 grit on it and I like to put my back Planes on there and give a few strokes. It helps see where your issues are on crooked/high PEMS. Just clean your boards REAL GOOD, then clean them again. The solder balls and gunk will come back to haunt you.
 

Vintage 700b

Chief Journeyman
Joined
Mar 13, 2019
Messages
795
Location
Wisconsin
Tagline
Fabricator
#28
Also, after you are done soldering the PEM's use a tap and get that solder out of the threads. You'll have to reef on the screws if you dont, and then you can't tell how snug the transistors/SilPads are causing you MORE headaches.

I have a flat piece of heavy MDF with a sheet of 600 grit on it and I like to put my back Planes on there and give a few strokes. It helps see where your issues are on crooked/high PEMS. Just clean your boards REAL GOOD, then clean them again. The solder balls and gunk will come back to haunt you.
Perry's advice is right on the money:
"Just clean your boards REAL GOOD, then clean them again. The solder balls and gunk will come back to haunt you."
This is the voice of experience talking, patience, check, and double check continuity, and clean, clean, clean.
 

WOPL Sniffer

Veteran and General Yakker
Joined
Aug 10, 2015
Messages
11,522
Location
Minnie-Soda
Tagline
Screw it
#29
Perry's advice is right on the money:
"Just clean your boards REAL GOOD, then clean them again. The solder balls and gunk will come back to haunt you."
This is the voice of experience talking, patience, check, and double check continuity, and clean, clean, clean.

Yep, had it happen back in the early days.
 

gary33030

Journeyman
Joined
Aug 28, 2022
Messages
88
Location
Homestead, Florida 33035
Tagline
I've had Phase Linear before!
#30
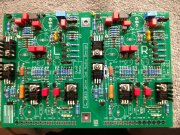
I thank you for all your help and input. I know me. I'm going to shoot off an email to Joe and order a new backplane board. I'll hold this board for a Phase Linear 4 fin 400 amp. Before I do, can any and everyone give me their views on control board. Am I at least improving?

Why did I not get a half naked girl for joining your forums/ LOL.
 

Attachments

WOPL Sniffer

Veteran and General Yakker
Joined
Aug 10, 2015
Messages
11,522
Location
Minnie-Soda
Tagline
Screw it
#31
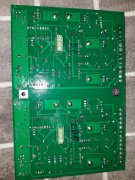
Just a helping tip, This is after cleaning #2.

I clean before adding the caps, and connectors (yep, R37 is populated now) because that is a lot of hiding spots for funk and solder balls. Yeah, my soldering aint perfect but who's is? All we can do is try to keep up with Joe by always try to make it better. It suck when you spend countless hours on building your amp and the dreaded Dim Bulb doesn't dim (or worse... Kaboom)..... Good luck


front.jpg back.jpg
 
Last edited:

Gepetto

Administrator
Staff member
Joined
May 15, 2011
Messages
13,959
Location
Sterling, MA
Tagline
Old 'Arn Enthusiast
#34
I thank you for all your help and input. I know me. I'm going to shoot off an email to Joe and order a new backplane board. I'll hold this board for a Phase Linear 4 fin 400 amp. Before I do, can any and everyone give me their views on control board. Am I at least improving?

Why did I not get a half naked girl for joining your forums/ LOL.
Hi Gary
Your control board build looks quite good. Perhaps Navo will think it is good enough to be naked girl worthy :)

What solder are you using? What type of snips are you using?

If you send your backplane assemblies to me, I will touch up all your PEM joints to get you going.

Joe
 

gene french

Veteran and General Yakker
Joined
Mar 6, 2022
Messages
5,558
Location
guayabo de bagaces, guanacaste, costa rica....
Tagline
music...the healer of souls...
#35
Hi Gary
Your control board build looks quite good. Perhaps Navo will think it is good enough to be naked girl worthy :)

What solder are you using? What type of snips are you using?

If you send your backplane assemblies to me, I will touch up all your PEM joints to get you going.

Joe
what a cool thing to do...
 

Gepetto

Administrator
Staff member
Joined
May 15, 2011
Messages
13,959
Location
Sterling, MA
Tagline
Old 'Arn Enthusiast
#40
Joe,
I'm using: Kester 24-6040-0039 Rosin Cored Wire Solder. (Another gentlemen here was using.)
and
KATA 5 Inch Micro Wire Cutter,Precision Mini Flush Cutters.

Never doubted the generous group here!!!
Gary
You will find it much easier to use 63/37 for electronics work. It is a eutectic formulation and is designed specifically for electronic assembly work. Also using the no clean flux types is preferred as the clean up is much easier than with rosin core solder. Kester 245 1.1% flux content is such a solder. If you switch, you will see a big difference in ease of soldering and cleanup.

The eutectic 63/37 has a melting point of 183C vs 190C for the non-eutectic 60/40
 
Top