I hope it is worth it George...Slow progress.
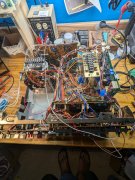
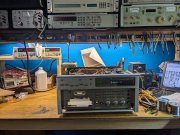
Not a fan of twisting cables, but it was the right thing to do with the header cables. Gives me room to work and I can actually see the boards. Can also now see where they begin and end.
There was a lot of point to point wiring crossing here and there, board to board, with the connections relatively inaccessible.
Pulling a single board was a PITA,
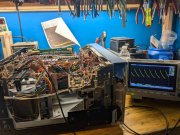
I'm unitizing it with barrier strips for the single wires that go board to board. Will be now easy to pull a board. Unplug any header cables and pull the spade terminal ends off the barrier strip.
One barrier installed for the power supply, and one for the motherboard. A additional one gets installed for the switch amp board, and perhaps a fourth if needed.
Really didn't want to install a barrier over the transformer, but no choice, just no extra room anywhere.
Made the brackets, and those aluminum standoffs will be replaced with high temp black nylon standoffs when they arrive. Should lessen chance of hum and noise.
Three vertical boards and the transport still need added.
Listening to The Myrrors-Warpainting.

You are using an out of date browser. It may not display this or other websites correctly.
You should upgrade or use an alternative browser.
You should upgrade or use an alternative browser.
PL7000S2
- Thread starter George S.
- Start date
If I can get it working without making a catastrophic mistake, yeah, worth it.
I think the changes I'm making are key.
However, it's gonna take time to check all the interconnects before bringing it up.
That's alright.
Would be working on something else if not this.
I think the changes I'm making are key.
However, it's gonna take time to check all the interconnects before bringing it up.
That's alright.
Would be working on something else if not this.
Attachments
So, here's where I'm at.
Every replaced component checked for proper polarity and marked with a sharpie once checked. I found one reversed electrolytic, my error, fixed it.
Have checked the wiring point to point twice, against the schematic. No errors found.
So, it's ready to bring up on the Variac and DBT.
Can't do it.
I feel like I'm rushing it.
Going to sit it aside for a week or two and come back to it fresh with "new eyes" and recheck the wiring one more time.
31 point to point wires connecting board to board were replaced with PTFE silver plated milspec wire, and a barrier strip connection at the midpoint.
The point to point factory wiring is now gone and it's modularized.
Attachments
Vintage 700b
Chief Journeyman
Super neat George, very clean and organized.
Outstanding job !
Outstanding job !
Bob Boyer
Veteran and General Yakker
Fantastic, George. No telling what that deck would cost if Pioneer had paid that much attention to detail.
- Joined
- Jun 12, 2010
- Messages
- 10,094
Nothing wrong in not rushing it, George. This has been a great project to follow.
Yes - there is the ad that appeared in most audio magazines of the time (1978) pitting the Pioneer CT-F1000 against the Nakamichi 1000II.

Nando.
Yes - there is the ad that appeared in most audio magazines of the time (1978) pitting the Pioneer CT-F1000 against the Nakamichi 1000II.
Nando.
That's it Nando!Nothing wrong in not rushing it, George. This has been a great project to follow.
Yes - there is the ad that appeared in most audio magazines of the time (1978) pitting the Pioneer CT-F1000 against the Nakamichi 1000II.
View attachment 82812
Nando.
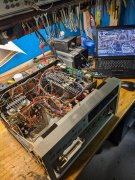
Temporarily installed the transport to set the single trimmer "reel motor voltage" that's on the power supply PCB, and the single trimmer "control IC clock" on the rear switch control board.
Everything adjusted up to spec, trimmers close to mid point of adjustment, rail voltages are good, transport takes up tape slack, plays, fast forwards and rewinds the winnowed shell tape I made.
No heads or pinch rollers are installed, still need to get the rollers sent off to Terry. Didn't want to spend that extra money if this was a bust.
Time to sit this aside until I get the rollers rebuilt.
I've got two broken Fluke 8920A's to fix. One has a overheating voltage regulator and missing 15 VDC rails. The other flashes "700", not sure what the issue is, think it's hunting for the appropriate voltage band and not finding it.
Attachments
- Joined
- Jan 14, 2011
- Messages
- 75,909
- Location
- Gillette, Wyo.
- Tagline
- Halfbiass...Electron Herder and Backass Woof
George, just having that thing power up with no glitches or smoke is a major accomplishment. Even sweeter is the behavior of the trimmer pots. Good job.
And then on to the test gear. My 24 volt power supply is on the fritz too, I'll be tearing into it when I'm done with the 300's..
And then on to the test gear. My 24 volt power supply is on the fritz too, I'll be tearing into it when I'm done with the 300's..
There's always something that needs fixed or maintained! Never stops.
Going to cut the grass and start pulling and testing tantalums on the Flukes later this evening.
I did get the pinch rollers sent off to Terry yesterday. There are cheaper options, but I think having him do them will pay off in the long run.
Going to cut the grass and start pulling and testing tantalums on the Flukes later this evening.
I did get the pinch rollers sent off to Terry yesterday. There are cheaper options, but I think having him do them will pay off in the long run.
Modified a old miniature nut driver to fit those weird tamper proof screws that hold the trim plate over the heads.
I did look for the correct bit, and even ordered a set.
Close, but incorrect. This will work.
Luckily the aluminum screws are still in good shape and just need a little polish.
I did look for the correct bit, and even ordered a set.
Close, but incorrect. This will work.
Luckily the aluminum screws are still in good shape and just need a little polish.
Attachments
- Joined
- Jan 14, 2011
- Messages
- 75,909
- Location
- Gillette, Wyo.
- Tagline
- Halfbiass...Electron Herder and Backass Woof
George's fab-o-matic...
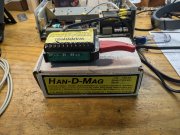
Got a Annis Han-D-Mag and been practicing on large and small screwdrivers.
There's definitely a technique to correctly demagnetizing a object.
VERY easy to magnetize with incorrect technique!
I keep a couple strong magnets on the bench for magnetizing larger screwdrivers, and small hand tools are stuck to magnetic tool holding strips.
Probably not ideal to have magnetized tools for tape machine work.
It's double ended and will supposedly erase a cassette. We'll see.
Also going to look for a Gauss meter.
Attachments
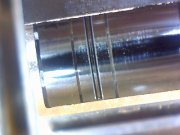
Cleaned the heads again with Acetone. Not happy as there appeared under magnification to be a deposited polymer and oxide film the acetone wasn't cutting.
Got out the old Turtle Wax Chrome Polish and Rust Remover, and started polishing with Q-Tips.
Worked excellent, the head surfaces cleaned up nicely.as well as the sides.
Went through about 5 Q-Tips before they stopped picking up dark oxides,.
Can't be good having a built up of tape polymer and oxide film around the head assembly and in the head grooves
Been holding off on doing head resistance checks until I got the demag as I read the ohm meters DC voltage magnetizes them.
Playback is L- 211.4 ohms, R- 212.6 ohms
Record L- 41.1 ohms, R- 41.2 ohms
Erase- 2 ohms.
Looks good.
Tested to see if they did magnetize.
Nope, wouldn't pickup a very tiny piece of steel wire.
I'll demagnetize the transport once it's assembled.
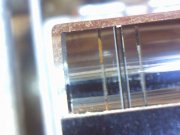
Still have deposits in the gaps that a Q-Tip won't touch.
Paper edge is way too thick.
Think I'll slice a thin shaving off a tooth pick, make a little soft wood micro pick/brush.
Later, gonna spin some Skynyrd.
Paper edge is way too thick.
Think I'll slice a thin shaving off a tooth pick, make a little soft wood micro pick/brush.
Later, gonna spin some Skynyrd.