PL7000S2

George S.

Veteran and General Yakker
Joined
Feb 18, 2020
Messages
5,019
#61
Going to save this bad boy for my next session.
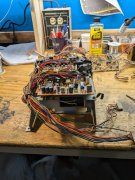
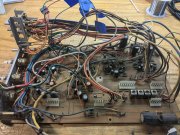
The "motherboard". Nasty!
This sits horizontal in the chassis bottom and three vertical boards plug in.
The three largest electrolytics are glued onto the board with their leads across the boards topside to wire wrap posts.
I'll clean this one outside with alcohol, acid brush, and compressed air.
 

Attachments

Gepetto

Administrator
Staff member
Joined
May 15, 2011
Messages
13,927
Location
Sterling, MA
Tagline
Old 'Arn Enthusiast
#63
Going to save this bad boy for my next session.
The "motherboard". Nasty!
This sits horizontal in the chassis bottom and three vertical boards plug in.
The three largest electrolytics are glued onto the board with their leads across the boards topside to wire wrap posts.
I'll clean this one outside with alcohol, acid brush, and compressed air.
Looks like a thrill to work on...
 

George S.

Veteran and General Yakker
Joined
Feb 18, 2020
Messages
5,019
#66
Got the capacitor list made.
194 electrolytics of 43 different values.
And, 2 tantalums of different values on the AC motor control board.
I see no ceramics in the audio path, and no electrolytics where there was room to fit a film.
Going to recap this one as it came equipped, no changes.
 

wattsabundant

Chief Journeyman
Joined
Apr 26, 2011
Messages
931
Location
Central Ohio
#75
Will double the voltage ratings on the tants.
I'm not sure that doubling the voltage serves any purpose especially if the physical size or lead spacing changes. Unlike aluminum electrolytics who tend to fail open, the failure mode of tantalums is they short. I've seen this probably a dozen times. life expectancy seems to be 15 -20 years.
 

George S.

Veteran and General Yakker
Joined
Feb 18, 2020
Messages
5,019
#76
I'm not sure that doubling the voltage serves any purpose especially if the physical size or lead spacing changes. Unlike aluminum electrolytics who tend to fail open, the failure mode of tantalums is they short. I've seen this probably a dozen times. life expectancy seems to be 15 -20 years.
Don, I've never replaced a tantalum. These will be the first.
Thought doubling the voltage ratings was normal procedure on them.
We're road tripping the Poconos this week and all the notes are home. Think the originals are 16V and the blue ones which are supposedly trouble free in Japanese gear.
Still, time to replace those two. They're each in circuit with a "Pioneer " branded IC.
Can't take a chance on a short.
 

George S.

Veteran and General Yakker
Joined
Feb 18, 2020
Messages
5,019
#77
Got the caps ordered last night.
Spent the morning cleaning hardened finger crud off the push buttons. 91% alcohol wouldn't cut it. Tried "Goo Gone", worked excellent.
The pots are too complicated to disassemble unless they're failing and it's last resort, so cleaned them with DeoxIT D5 applied with a needle and syringe. Most have windows I can apply DeoxIT grease through.
So, was soldering the wire wraps the right decision?
Yes and no. Found two issues with them.
Several were loose on the post and moved down when I pressed the irons chisel tip against them. No possible way they were "gas tight".
And, the wraps around the square posts were full of crud and contaminated.
No clean flux wasn't working. Oxidation and dirt was brought out riding the flux and fouled the iron tip and joint. The solder wouldn't flow. Many nice round solder balls laying on the board.
Switched to rosin paste and was able to make good joints with lots of tip wiping.
Got them all soldered, but sitting here thinking about it, it's BS. Two joints at a wire end when only one is needed.
Going to remove the damn things once I get the new caps installed and solder wiring and cables directly to the board.
Extra work, but it's worth doing.
Next time I'm in the Pioneer built PL5100S2 tuner, all the wire wraps are coming out!
 

Gepetto

Administrator
Staff member
Joined
May 15, 2011
Messages
13,927
Location
Sterling, MA
Tagline
Old 'Arn Enthusiast
#78
Got the caps ordered last night.
Spent the morning cleaning hardened finger crud off the push buttons. 91% alcohol wouldn't cut it. Tried "Goo Gone", worked excellent.
The pots are too complicated to disassemble unless they're failing and it's last resort, so cleaned them with DeoxIT D5 applied with a needle and syringe. Most have windows I can apply DeoxIT grease through.
So, was soldering the wire wraps the right decision?
Yes and no. Found two issues with them.
Several were loose on the post and moved down when I pressed the irons chisel tip against them. No possible way they were "gas tight".
And, the wraps around the square posts were full of crud and contaminated.
No clean flux wasn't working. Oxidation and dirt was brought out riding the flux and fouled the iron tip and joint. The solder wouldn't flow. Many nice round solder balls laying on the board.
Switched to rosin paste and was able to make good joints with lots of tip wiping.
Got them all soldered, but sitting here thinking about it, it's BS. Two joints at a wire end when only one is needed.
Going to remove the damn things once I get the new caps installed and solder wiring and cables directly to the board.
Extra work, but it's worth doing.
Next time I'm in the Pioneer built PL5100S2 tuner, all the wire wraps are coming out!
They did it because it was fast George...
 

George S.

Veteran and General Yakker
Joined
Feb 18, 2020
Messages
5,019
#79
They did it because it was fast George...
I agree and that was my initial thought.
Then I read up on it and what "Pioneer Enthusiasts" had to say about it on other forums.
I'll reuse most of the wire because of the many plug-in headers. The header sockets and pins are in excellent shape.
The cables are also good, and they used extra long lengths of everything so I have plenty to work with.
But those wire wraps on that horizontal motherboard are like miniature electronic bug zappers full of carbon and dirt residue.
Yup, they'll solder with rosin, but the crap the rosin brings out of the joint is surprising.
I'll use a few after I clean and tin them for board to board connections where they make sense to aid assembly and future troubleshooting.
Also have 3 caps that solder directly to them.
The majority are coming out!
 

George S.

Veteran and General Yakker
Joined
Feb 18, 2020
Messages
5,019
#80
Did some further investigation.
So the soldering issue is only under the chassis cover vents.
The transport sits in a unvented and protected area and the wire wraps on it soldered nicely with no added flux or fouling.
The ingress of contaminates matter and yeah, that motherboard was covered in it.
Some posts do have 2 wires attached which won't fit a single hole, and the posts do make a convenient and accessible test point.
So, perhaps it's best to unwrap, clean and tin the post, rewrap with clean wire end, and then solder.
That's what I'm going to do!
Used to have military wire wrapping screwdrivers long ago, but long lost and gone.
Time to find a new one.
 

Attachments

Top