WOPL Sniffer
Veteran and General Yakker
I would probably end up rebuilding the 4000 and still be at a loss for caps !
I wouldn't sacrifice a 4000t but I WOULD sacrifice a 4000/C-4000

I would probably end up rebuilding the 4000 and still be at a loss for caps !
That’s for sureI would probably end up rebuilding the 4000 and still be at a loss for caps !


I emailed the drawing to work. I have 3-d design software there to use.
I have gray “abs-like” resin on hand (also clear) and I’ve been printing stuff for my son to use with his monster trucks. It is still a bit brittle, but better than standard resin.
The printer will hold 0.05mm resolution so detail is not a problem.
View attachment 71777View attachment 71778
Your CAD skills are much better than mine. These are a very accurate depiction of the Carver pushbutton covers, but I am trying to match the rectangular Phase Linear pushbutton covers. You can shape a PL pushbutton cover into a Carver pushbutton cover with some precision file work, but not the other way around. Also, it seems the PL covers are more scarce than the Carver covers.I'm just spit-balling in FreeCAD, about 20 minutes in, no experience, just trying to get a shape.....
View attachment 71773
Can't wait to see the results of your work!I emailed the drawing to work. I have 3-d design software there to use.
I have gray “abs-like” resin on hand (also clear) and I’ve been printing stuff for my son to use with his monster trucks. It is still a bit brittle, but better than standard resin.
The printer will hold 0.05mm resolution so detail is not a problem.
View attachment 71777View attachment 71778
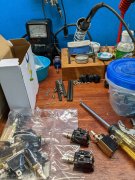
The power switches arrived. They're marked 10 amps 250 VAC. Nice heavy solder lugs with a large hole for 14 AWG with room to spare. VERY nice. Thanks Sniff!This is more like it. I may order a couple sets myself.
https://www.ebay.com/itm/252661219693?hash=item3ad3c8416d:g:yCAAAOSwSzZdQzOH&amdata=enc:AQAHAAAAoIss7zvriWM1sP0L3o7oFsbETfAMFGGQJhTWzAG5jIycG+J7DxS4caLE9jMZ8J8xT7+QmyuKLMtVm+1dkJsck/OomjlceXtaaiapQBI8OPToeJP300kcOnOAzKAgrso/qDThdWsWzj1Pe5RL82dbs4cSfvEuIryfQ2xrn6jeRVMBzW2F7jiLRnu14y5unVilJG6ejASSb06TC+Npt4FUKak=|tkp:Bk9SR-zTnoWaYQ
The power switches arrived. They're marked 10 amps 250 VAC. Nice heavy solder lugs with a large hole for 14 AWG with room to spare. VERY nice. Thanks Sniff!