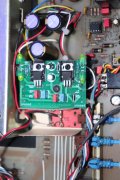
PL 3300 Series II rebuild/upgrade

orange

Veteran and General Yakker
Joined
Jul 6, 2010
Messages
17,704
Tagline
Broken beyond repair but highly affable
Perry, I'm using an old Dell XPS 420 and Windows 10 with a 2.40 Core 2 quad E6600, much better than the same model in the other room with Win 7 and a Celeron (Celery) 1.6, both with maxed 4 GB (~3.37) RAM. Vista era stuff. I'm appreciating the quality of the images at least. The Celery is as slow as I am with a slow CPU and no decent L2 IIRC.

No amount of cheese or peanut butter makes a Celery better.
 
Last edited:

WOPL Sniffer

Veteran and General Yakker
Joined
Aug 10, 2015
Messages
11,223
Location
Minnie-Soda
Tagline
Screw it
It's all wired wrong. Look at what the Power Supply contains, and what it replaces. The 3300 power supply is rudimentary at best. It needs to be wired like I said in the last 10 posts. I can fix this preamp it a half hour. If you are unsure, maybe some free help is warranted... The regulated out, needs to go to R1/R3.. BUT (BUT), you need to isolate the D1-D4 outputs.
 

WOPL Sniffer

Veteran and General Yakker
Joined
Aug 10, 2015
Messages
11,223
Location
Minnie-Soda
Tagline
Screw it
Look at the skizmo, unregulted goes into R1 as VCC, some voltage is dropped by R1 (to 15.5 vdc) and is now VCC1,, more voltage is dropped by R4 and R6 to be used throughout the preamp.
 

WOPL Sniffer

Veteran and General Yakker
Joined
Aug 10, 2015
Messages
11,223
Location
Minnie-Soda
Tagline
Screw it
OK, depending on what regulator chip you have installed, you need to check (ON THE SCHEMATIC), what you have for VCC1, VCC2, VCC3, AND VCC4. across the board VEE1-VEE4 also.

VCC1 needs to be about +18 VDC,
VEE1 Needs to be about -18 VDC

VCC2-VCC4 needs to be +15.5
VEE2-VEE4 needs to be -15.5

Check it at different points on the board. If you get the above readings, don't worry about R1 and R3 but you got's to have those readings. I don't remember what regulator chips you have but those numbers should be real close. Don't just check at the power supply, check around to ensure.
 

scottonnob

Journeyman
Joined
Apr 28, 2015
Messages
251
Tagline
---
I had to put my 3300 project away for a few months, but got back to it last week. I dropped R1 and R3 back in and fired things up. The unit now seems to be working beautifully. However, when other equipment is plugged into that power line, whenever I turn things off, I get a loud pop through the audio system. There’s a Casablanca ceiling fan on that same breaker and it’s wreaking havoc on the preamp whenever I switch it off. Also, if I toggle the ‘Tone’ button in and out, I get the same popping. I’ve rechecked all the wiring and connections, but all seems to be in order. Does anyone have an idea what the problem may be?
 
Joined
Apr 28, 2015
Messages
251
Tagline
---
My 3300 sounds fantastic! Unfortunately, there's hum that seems to be coming from the volume pot. I pulled the pot, took it apart and cleaned it thoroughly, then carefully resoldered. The problem went away initially, but came back after the unit was up to temp. The hum is loudest at 0 volume. One click up, it's quieter, but still there. The higher the volume the lower the hum, until it goes away completely about 1/3 of the way up. My instinct is to replace the pot, but I'm not certain that will fix the problem. Could it be something on the board? A cracked trace? Pulls away when it heats up and expands? Just buy the pot and eliminate one possibility? Any thoughts would be appreciated. Also, I did not fully disassemble the pot because of the troublesome clip on the back of the shaft. So I didn't actually see the wipers or the track.
 

George S.

Veteran and General Yakker
Joined
Feb 18, 2020
Messages
4,539
I just read the entire thread. I don't have the schematic and am on a smart phone.
I suppose this preamp has B+ and B- rails and a center tap transformer.
As Sniff (Perry) asked way back when, have you checked the DC voltage of the B+ and B- rails? This is critical for proper operation. Especially so for integrated circuits such as opamps.
Reread what Sniff posted please.
 

George S.

Veteran and General Yakker
Joined
Feb 18, 2020
Messages
4,539
I'd also download the data sheet for the original opamps to see what the maximum voltage spec is and what the pin outs are. Then check voltage at those supply pins. Usually marked Vcc+ and Vcc- if I remember correctly.
 
Joined
Apr 28, 2015
Messages
251
Tagline
---
I'd also download the data sheet for the original opamps to see what the maximum voltage spec is and what the pin outs are. Then check voltage at those supply pins. Usually marked Vcc+ and Vcc- if I remember correctly.
Thanks, but yeah, I checked all the voltages. Also, the damn thing worked just fine for a long time. This is new. It's improved since I cleaned the pot, but it didn't go away. And when I put the pot back together, still off the board, I checked it with a meter, and it was doing weird stuff. The ohms would go down nicely and proportionately, but when it hit the stop it would jump back up 10ohms. I thought about just replacing it then, but went ahead and put it together to see if it was fixed. But no new parts have been added, or changes made. It ran fine for more than a year, then sat for a year, protected, until yesterday.
 

George S.

Veteran and General Yakker
Joined
Feb 18, 2020
Messages
4,539
I see. If you took a wiper assembly out, you may have reassembled it 180 degrees out. On some pots this is a easy mistake to make, on others, the design won't allow this to happen.
Ideally, totally disassemble it, clean everything with Qtips and alcohol. Carefully remove any hard deposits on the rotating wiper and slip ring the least destructive way you can. All metal contacts should be polished. Carefully, very lightly, grease the tracks, contacts, shaft, and barrel with fader grease. Just a light film.
Carefully reassemble paying attention to orientation of the wipers. Then exercise it back and forth to "break it in".
Lots of conflicting info on the web about conductive grease, non conductive grease, oils, carbon safe, plastic safe, alcohol or not on carbon, shaft striction grease for proper feel, etc.
I just settled on using alcohol, Qtips, and DeoxIT fader grease.
 
Last edited:
Joined
Apr 28, 2015
Messages
251
Tagline
---
I did not take it apart because of the starlock on the back of the shaft. All I did was get some space between the two mods, then used DeOxit, several times, along with air to gently blow it out. After that, I used the DMM to check the ohms, and something wasn't right at the zero mark of the pot. Therefore, as you suggested, I think it's time to pull it out again and, this time, get the ring off and completely disassemble the pot, if only to inspect it. My suspicion is that the unit is just worn out and will need to be replaced, which isn't a lot money. So thanks for the input. You essentially confirmed what I figured I should do next. Until I see the wipers and pads, I don't really know a thing. I just typically hate dealing with those starlock keepers. But the are easily replaced in kind. Thanks again.
 

wattsabundant

Chief Journeyman
Joined
Apr 26, 2011
Messages
842
Location
Central Ohio
Whether the pot reads zero ohms or 10 ohms when at minimum position it doesn't matter. You would likely see about the same thing on every pot. For the regulators look at my post #55.

On my 3300 I found that the raw voltage from the rectifier at 120 VAC input was 18 VDC. At 110VAC the rectified voltage was 16.4 VDC.

Three terminal regulators need a minimum of 2.5 VDC higher on the input than the the desired output. So a 7815 would need a minimum of 17.5 VDC from the rectifer to properly operate. For stability I assumed the line voltage was 110 VAC. Consequently a 7815 would be starved for input voltage at 110 VAC line voltage.

Based on this I built regulators using 7812's and 7912's on perfboard. The load current was only 60 milliamps. So I felt comfortable using the TO92 package to save space. I looked at the output of the regulators with a scope to verify they were stable at 110 VAC on the input. The regulators did not have significant temperature rise without a heatsink.

What does all of this mean? If the rcetified DC voltage feeding the regulators is not high enough, the regulators may become unstable and oscillate causing noise. That defeats the purpose of the regualtors. To test it read the input (raw DC) voltage to the regulator and then it's output voltage. If the difference between the two readings is less than 3 volts the regulator may be a source of noise. To assure stability, readings should be taken using a variac to reduce the line voltage to about 110 VAC.

As far as proper input/output capacitors go, the regulator data sheet calls them out.
 
Last edited:
Joined
Apr 28, 2015
Messages
251
Tagline
---
Thanks for the input. I'm going to check those readings tomorrow. But are you aware that there has been a modification to the power supply? It's in this thread. The modification was vetted by everyone who looked at it. One of our community even printed up the new boards. I don't think that should affect what you are referencing, but I don't know for certain. Nonetheless, this thing was working for some time before I pulled it to try out another pre I picked up.
 
Joined
Apr 28, 2015
Messages
251
Tagline
---
All by itself, on the bench, 120VAC measured, voltages appear to be spot-on: +15.15. -15.03/ +18.45, -18.55. What next? There was speculation that the pot was not the issue. However, the hum was there at zero volume, but gone by 1/3 volume. Why would it disappear, other than because of the pot? Wouldn't it usually stay steady? But it actually changes volume with the pot being turned.
 
Joined
Apr 28, 2015
Messages
251
Tagline
---
The way this all started was when I hooked the unit back up and turned it on, for the first time in a about a year, I was getting hum. When I fiddled with the knob, it varied, but didn't go away. I pulled the cover and fiddled with the body of the pot and was able to generate even more variation. I figured a solder joint. I pulled the unit and resoldered the pot after cleaning as best I could. When I plugged it back in, no hum. Beautiful! 40 minutes later, the hum was back and louder. It was apparently heat related. The solder joints are rock solid now. I figured must be something with a wiper or pad inside.
 

George S.

Veteran and General Yakker
Joined
Feb 18, 2020
Messages
4,539
If it is heat related, you can try some freeze spray to narrow down the part. Or, put the unit in the refrigerator or freezer to really cool it down, pull it out and plug it it quickly. Then heat suspect components with hot air.
I'd confirm the pot is bad before replacing it as getting the proper replacement is probably difficult. If easy to source a new one then go for it.
 
Top