Micro (Seiki) BL-91 restoration

NeverSatisfied

Chief Journeyman
Joined
Nov 3, 2021
Messages
916
Location
Houston Texas
Tagline
Play the Game, don’t be the Game
#21
Judging from the pictures your arm seems to be far more sophisticated and more solidly built than the 707. Granted my examples are in rough condition but as far as quality of materials I was far more impressed with some of the Sony arms I have taken apart.
 

J!m

Veteran and General Yakker
Joined
Dec 24, 2019
Messages
10,881
Location
Connecticut
Tagline
BOT
#24
Once it's set up, you don't have to touch a thing. Even running the test record for final tweaks, an hour is plenty of time. The easier it is to make the adjustments, the faster it goes.

If you change the cartridge (or complete head shell) you need to adjust for the change in mass and (possibly) stylus shape. If you're swapping a stylus on a set up cartridge for an identical replacement, you don't have to do anything either.

It's just having the ability to set it up well to match the cartridge to the arm (effective mass/compliance) and get the anti-skate optimized for no distortion, particularly on inner grooves.
 

J!m

Veteran and General Yakker
Joined
Dec 24, 2019
Messages
10,881
Location
Connecticut
Tagline
BOT
#26
Thanks. I'm very pleased with the monolith.

I'm working on the arm base today. Already re-polished the counterweight. Other pieces are in ultrasonic acetone to strip off the 40+ year old grease in the collet assembly...

Unfortunately, it looks like the nickel plated brass parts are suffering from corrosion. I'm going to test a few things, but I may end up having to glass bead blast the parts and rattle can them silver after... Hopefully not.
 

J!m

Veteran and General Yakker
Joined
Dec 24, 2019
Messages
10,881
Location
Connecticut
Tagline
BOT
#27
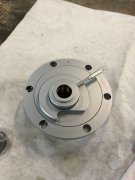
Got some work done in the arm base. It weighs 4 pounds 6.2 ounces. I think six bolts to hold it down is completely overkill. Perfect.

I’m liking these guys more and more…

D56F38DC-9DF2-4E9B-9D8C-1B3E0C59A03F.jpeg
testing/before condition

93910CBA-1125-46AD-8E87-67C7D7DAFBE1.jpeg
clean and oiled with precision oil (used for micrometers etc.)

021294E1-7425-4042-9175-80F9195C14A6.jpeg
Fresh grease where appropriate and reassembled. It works so much smoother now! Cleaned up reasonably well.
 

Vintage 700b

Chief Journeyman
Joined
Mar 13, 2019
Messages
803
Location
Wisconsin
Tagline
Fabricator
#30
Jim, the progress looks great.
I completely went through my TD-124 a few years ago, new bearings in the motor and reworked the eddie current speed control. New switches, and set the platter bearing up for another 60 years. New isolation rubbers, and new idler wheel. I did everything but paint the chassis. I tore it down to the bare chassis, but it is a 1957 table, and the paint is original, and pretty nice. Original neon speed control lamp works as it should as well. The platter on it weighs 4.3kg (9.5 lbs.). I bought it in 1970 and added an SME 3009 arm about 73. The SME is so adjustable and I have replaced the rubber bushing once but easy to set up and maintain. I run the cartridge right at 1.2 grams, and it just purrs. People always ask me how many albums I have played on it....wish it could talk!
Where I was going with this, is that when you are all finished, and kicked back listening, it will feel fantastic because you did such a thorough job. Really nice work!
Art Blakey Roots and Herbs 1.jpg
 

J!m

Veteran and General Yakker
Joined
Dec 24, 2019
Messages
10,881
Location
Connecticut
Tagline
BOT
#31
Thanks!

I hope I can do it justice. I don’t understand how such fine gear can end up in such poor condition. It was not an insignificant expense to buy one new…

Big items to deal with are the wood finish and the damper paddle. Most I can find are broken… I have a 3D printer but I don’t (yet) draft in 3D. I might need to rectumfry that shituation. I’ll hunt for the correct cheese head metric slotted screw to hold the paddle on too. That might not be so easy…
 

WOPL Sniffer

Veteran and General Yakker
Joined
Aug 10, 2015
Messages
11,522
Location
Minnie-Soda
Tagline
Screw it
#32
Thanks!

I hope I can do it justice. I don’t understand how such fine gear can end up in such poor condition. It was not an insignificant expense to buy one new…

Big items to deal with are the wood finish and the damper paddle. Most I can find are broken… I have a 3D printer but I don’t (yet) draft in 3D. I might need to rectumfry that shituation. I’ll hunt for the correct cheese head metric slotted screw to hold the paddle on too. That might not be so easy…

Just like the PL amps, they were tools to most people and they didn't take care of shit. And we've seen some pretty rough ones over the years. All we can do it try to save what we can.
 

Vintage 700b

Chief Journeyman
Joined
Mar 13, 2019
Messages
803
Location
Wisconsin
Tagline
Fabricator
#33
I've restored, rebuilt and refinished many things in my life, (frame off cars, antique machines, many motorcycles, and antique furniture, to name a few) and it is always the last 5% that drives you crazy, getting just right. I have the original 1957 Thorens plinth for the TD-124, but it is just ugly compared to the period Ortofon that I have on it now. That is about a 1963 vintage plinth, but I redid it in the original gloss black piano finish. I made the armboard for it too, to fit the SME arm.
Yours is looking fabulous, it will be a masterpiece when you are done, and I sure don't see them anymore.
 

J!m

Veteran and General Yakker
Joined
Dec 24, 2019
Messages
10,881
Location
Connecticut
Tagline
BOT
#34
I get the tool thing. “Tools not toys” and all, and for an amp, sure. A turntable spinning in a radio station (or a pair in a nightclub) cool.

This is a piece of furniture. Easily six inches wider than my Rega. Nice wood veneer, nice finish on metal (only plastic is the trough and paddle for the damper on the whole thing). Maybe it was in a garage system or something but I can’t wrap my head around it.

But, no matter, it’s under proper care now.
 

J!m

Veteran and General Yakker
Joined
Dec 24, 2019
Messages
10,881
Location
Connecticut
Tagline
BOT
#35
My Mouser order arrived, so tonight, as long as nothing blows up around here, I'll start the rebuild and modifications.

I have a lab power supply kicking around (not really- it weighs about 40 pounds) so I could put power to this thing after the transformer to check voltages are correct before I even start the recap. Nothing looks warm or otherwise "alarming" so I expect it'll run just fine...

IMG_4727[1].JPG
 

J!m

Veteran and General Yakker
Joined
Dec 24, 2019
Messages
10,881
Location
Connecticut
Tagline
BOT
#36
so, I tore into it today. They left enough wire such that I don’t have to unwind the wires from their posts.

The bad news is the very first cap I pulled, is not the value of the schematic. So I don’t have a replacement of the board build value. I found one other where the value does not match the schematic. The rest match.

Who here can look at the schematic with the original values and the two changes in place, to tell me the implications of the value changes? I’m not sure which to use…
 

J!m

Veteran and General Yakker
Joined
Dec 24, 2019
Messages
10,881
Location
Connecticut
Tagline
BOT
#37
Today seemed productive…

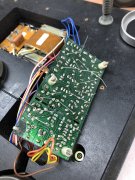
I got the caps I needed to go back to original value on the board, rather than schematic value. Got them all in and soldered nicely, no surprises there.

3E07A1E6-C439-4864-83FA-5B026DBDE25C.jpeg
B1AC62CE-160C-4706-96C7-968A4EDDBBD4.jpeg
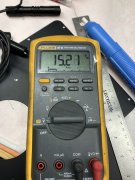
Then I severed the wires from transformer to board, to verify voltage. It’s a bit higher than I expected but not a ton.

A24C1489-EA7E-42B1-8BA4-622F3640A7EE.jpeg

I Disney-engineered the resistors in line to test- no drop since there’s no load… so I went for it, temporarily attaching the board through the 4-ohm resistors.

And I got nothing! Turned it on and I don’t have the LED lighting up or the motor turning. Nothing- like it’s unplugged. Running low on time I went ahead and mounted the resistors onto the switch so you can switch them in and out. I’ll make an opening in the bottom cover and you can switch it easily.

E59567E6-DDA3-4686-8EC0-CC1F54BDB360.jpeg

I’ll triple check the caps tomorrow, but I don’t think that’s the problem… I suspect this didn’t work before I messed with it. After I confirm the caps are alll in correctly I’ll have to start checking voltages. I’m guessing either the bridge is dead, or one of the transistors, similar to what happened with the 880.

I’m deeply displeased right now…
 

Attachments

Joined
Nov 15, 2021
Messages
482
Location
near Liverpool, NY
Tagline
Lifelong student / listening = bliss
#39
My Mouser order arrived, so tonight, as long as nothing blows up around here, I'll start the rebuild and modifications.

I have a lab power supply kicking around (not really- it weighs about 40 pounds) so I could put power to this thing after the transformer to check voltages are correct before I even start the recap. Nothing looks warm or otherwise "alarming" so I expect it'll run just fine...

View attachment 63016
Not to sidetrack the discussion, but I am digging the transistor man logo on your PS:

J!m power supply cool logo(opt).JPG

Elsewhere on the interwebs I saw a different model PS from the same company, and right next to this fellow
the following phrase was added by the factory:

" Robotec Current Limiter"

Blow that up a little & IMHO it would make a very cool retro-tech t-shirt...

****

...and back to the regurlarly scheduled program already in progress.
 
Top