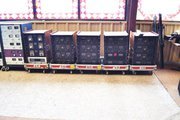
PL 700 Pro Build

Yes sir, that was the original wiring. I've learned to photo pretty much everything electrical before I take it apart. Sure beats drawing it all out like before cell phones!
Found a potential power switch and a meter switch(although it's a little long with extra contacts).
Links follow:
https://www.ebay.com/itm/NOS-HAFLER...2349624.m46890.l49286&mkrid=711-127632-2357-0
https://www.ebay.com/itm/Alps-SDU3P...2349624.m46890.l49286&mkrid=711-127632-2357-0
Many others are listed.
I will keep searching, but that Hafler will work just overkill. Went through Alps catalog and no more bracket slide mount crimp types.
How about this one, anyone have a switch pack out?
https://www.ebay.com/itm/3237374935...A%3D|ampid:PL_CLK|clp:2047675&epid=9030427567
 
Can be had new from Mouser…

I used similar switches on my phono preamp.
 
Ended up getting these, even correct color....
https://www.ebay.com/itm/144355158244
looks Good, Key word is 3-Way Independent sw's ! good find.
also when you get them do slide into the PL bracket?
The newer one like I posted w Pioneer, I had to modify and enlarge the original SQ bracket (not to easy to do, but possible) I will have to check if they slide into the PL bracket w/o modify it.?

Side Note (not theses) watch out for the multiple sw's ones , I took them apart and find that their all Momentary SW and they have a rod that locks them in one at a time , I think their call Piano type.
 
Jim, you are so right!
Got the IEC socket installed, very tight, but fits well after a little massaging. The right most heat sink is bolted in, and I can just slip a piece of paper between the socket and heat sink.
That heatsink is held in and indexed with Joe's stepped nylon washers and assembly bolts which replace the original output transistor sockets and screws. These are tighter tolerance than the original output transistor sockets and screws. Due to the tighter tolerance, the bottom two holes between the chassis and heat sink are slightly off and won't take the step washer.
Next step is to drill IEC socket retaining holes sized for pop rivets. Then, mock up the heatsinks on the chassis for best alignment with the nylon step washers, number their positions and orientation for future assembly, and carefully ream out any misaligned holes.
Joe's instructions detail how to do this with drill bits, but I use a small tapered reamer, and do it now, not later.


So there ARE fitment issues. Guess I'll have to think about new chassis' and then the dimpled portion of the face plate/chassis will be an issue.
 
So there ARE fitment issues. Guess I'll have to think about new chassis' and then the dimpled portion of the face plate/chassis will be an issue.
Yep, if you think that's a real issue. Was overcome on all 3 of my WOPLs. All three had alignment issues with that bottom right output. Used a drill bit on my two 400s and a tapered reamer on the Pro. Really not a big issue to me. I'm partial to the original chassis. The Pro had the typical bends beside the transformer. Built a simple wooden lever press in the garage on a workbench and massaged it back straight. Then filled and relocated some screw holes to make a stiffer structure.
I like reusing the original chassis and original paint or anodizing. I don't mind the patina.


Yes, I did the same on a stack of the Clair Brothers units. I started using Joes chassis' and heat sinks and saved a bunch of time. Having the anodized White Oak Chassis' with machined screw holes eliminated the risk of sheet metal crumbs from falling inside the amp due to sheet metal screws. And having his IEC receptacle is a bonus not to mention the extra room. But it's all moot since the face/chassis has mating dimples.
 
Yes, I did the same on a stack of the Clair Brothers units. I started using Joes chassis' and heat sinks and saved a bunch of time. Having the anodized White Oak Chassis' with machined screw holes eliminated the risk of sheet metal crumbs from falling inside the amp due to sheet metal screws. And having his IEC receptacle is a bonus not to mention the extra room. But it's all moot since the face/chassis has mating dimples.
Sales pitch?
 
Well, I was thinking. Maybe fill that countersink on the faceplate. Using the WOAD chassis would be easier. But then, doubt the faceplate and painted rack handles are going to be blemish free and match that beautiful chassis. The rack handles on my unit are standard anodized aluminium handles that are painted a slightly lighter shade of shiny olive drab than the face plate. I spent a lot of time mixing Testors enamel and fixing the worst of the scrapes, and it looks a lot better, but I think it goes better with the original chassis which is also painted a greenish charcoal.
To me the Pro just isn't as elegant as a Clair Bros or normal S2. It's got square cut faceplate corners and paint over the anodizing. But, it's rare and unique, so that's cool. Hope your faceplates and handles are in great shape, that'll help a bunch.
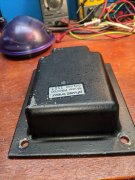
Oh, and the transformer bell has that unique Pro sticker. My bell was bent at the top from other amps being slid in on top. Cast aluminium that I was able to carefully work flat. Wood blocks cut to size were required.
 

Attachments

  • PXL_20210606_202553764.jpg
    PXL_20210606_202553764.jpg
    2 MB · Views: 18
Yes, I did the same on a stack of the Clair Brothers units. I started using Joes chassis' and heat sinks and saved a bunch of time. Having the anodized White Oak Chassis' with machined screw holes eliminated the risk of sheet metal crumbs from falling inside the amp due to sheet metal screws. And having his IEC receptacle is a bonus not to mention the extra room. But it's all moot since the face/chassis has mating dimples.
The countersinks in the back of the faceplate are of no matter Perry...
 
Hmm, was looking for something similar, but old style, pre-plastic. Phase Linear used a woven flexible tube to protect the power cord on a long run inside the 400s. Looks almost like fabric, probably flame retardant.
Been looking for it on eBay, Mouser, and Digikey for a good while with no luck. Chances are it is woven Asbestos so that's why I can't find it
We have a big Microcenter store up in Cleveland that sells all the braided plastics. Wonder if someone braids Teflon or Nomex. Going to look. Thanks Jim. Nice looking cord!
George look more for heat wrap sleeves. https://www.cabletiesandmore.com/high-temperature-braided-sleeving
 
Thanks Gary! That's a great site. That sheathing also has lots of automotive use I can immediately think of, like the starter wiring on a small or big block Chevy and the crank sensor wiring on the Buick 3800.
 
Last edited:
So found the issues. These old Dell power cords are funky. They came with the XPS 700, 710, or 720 with the 1000 watt power supply. I've got 2 XPS 700s and 2 720s and they all suffered from intermittent restarts. Now I know why. I can slightly move that cords end plug and watch the voltage drop.
Second issue is the Radio Shack True RMS meter. It's junk, gives a totally different result each time I take a reading. I'll keep the leads and new batteries, rest is going in trash
Going to order some new cords, and peruse the bay for another Fluke and a decent Simpson 260 or 270 analog meter.
The 12 VAC is right on the money if I slightly twist the cord end to make good contact.
You know George I hate when I find something like that ,that has been bitting me in the ass and wasn't even my or your fault right?
 
I agree. Went with new cords on all my amps and upgraded the test gear.
Really hate to see Radio Shack being long gone though. One of the few places I could pick up a genuine Shure cartridge or stylus. Think they sold more Shure products than any other retailer.
And Shure discontinued cartridge production in 2018, saying:
He explained while sales numbers have remained steady over the past 15 years, the 36 parts suppliers that made Shure cartridges, styluses, cantilevers, magnets, wire, etc. were struggling to keep up with demand and maintain the quality standards Shure requires.
https://www.cnet.com/tech/home-ente...-lovers-shure-exits-phono-cartridge-business/
 
That reminds me: I need a stylus for my V15-V if anyone has one.
 
Back
Top