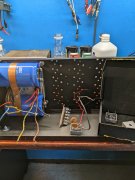
PL 700 Pro Build

George S.

Veteran and General Yakker
Joined
Feb 18, 2020
Messages
5,019
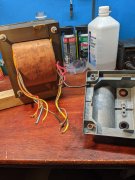
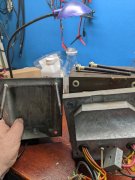
So, bench checking the transformers isolation from ground I found a issue. With all 8 step washers inserted into the transformer, the cast aluminum cover was grounding to the transformer because it's so tight fitting. Chances are that cover was grounding from day 1 and was surely grounding the first time it was bumped.
My solution was to put the rear step washers outboard of the cover rather than inboard. So the transformer and cover have continuity, but are isolated from the cradle and chassis. Maybe not ideal, but that's the best I can come up with without adding extra insulators to space the cover away of the transformer and longer bolts.
It's now isolated.
 

Attachments

George S.

Veteran and General Yakker
Joined
Feb 18, 2020
Messages
5,019
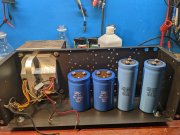
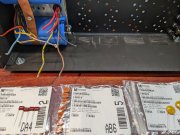
Unless I'm totally missing seeing something, a new strap needs to be fabbed to hold those new fat storage caps. The old are a tight fit.
The new ones do fit the cradle, and will clear the upper and lower plates.
Headed down to the garage to see what I can scrounge.
 

Attachments

Gepetto

Administrator
Staff member
Joined
May 15, 2011
Messages
13,927
Location
Sterling, MA
Tagline
Old 'Arn Enthusiast
So, bench checking the transformers isolation from ground I found a issue. With all 8 step washers inserted into the transformer, the cast aluminum cover was grounding to the transformer because it's so tight fitting. Chances are that cover was grounding from day 1 and was surely grounding the first time it was bumped.
My solution was to put the rear step washers outboard of the cover rather than inboard. So the transformer and cover have continuity, but are isolated from the cradle and chassis. Maybe not ideal, but that's the best I can come up with without adding extra insulators to space the cover away of the transformer and longer bolts.
It's now isolated.
Hi George
Not sure I clearly understand the problem based on your description. The transformer bell can be connected to the transformer laminations. No problem with that. The through bolts must be isolated from the transformer core and end bell since the lines of flux cut through the bolts in normal operation and produce eddy currents in the bolts. The bolts also have to be isolated from the chassis. The transformer laminations and cradle can likewise be connected together and to the chassis. Just the bolts have to be isolated.
 

Gepetto

Administrator
Staff member
Joined
May 15, 2011
Messages
13,927
Location
Sterling, MA
Tagline
Old 'Arn Enthusiast
Unless I'm totally missing seeing something, a new strap needs to be fabbed to hold those new fat storage caps. The old are a tight fit.
The new ones do fit the cradle, and will clear the upper and lower plates.
Headed down to the garage to see what I can scrounge.
I have my doubts those caps are original to the amp George.
 

George S.

Veteran and General Yakker
Joined
Feb 18, 2020
Messages
5,019
Joe, caps aren't original.
As for the transformer bolts. If I reassemble it like PL assembled it with the step washers inserted into the transformer, then the cover grounds the transformer to the bolts, then to the chassis. They screwed up. Incidentally, those step washers will not fit the cradle.
Found a nice piece of springy copper flashing, next weekend I'll cut out a strip, fab a nice cap strap.
 

George S.

Veteran and General Yakker
Joined
Feb 18, 2020
Messages
5,019
Joe, reread your posts. The bolts are not isolated from the chassis. I have more work to do there. Really need to drill the cradle to accept the step washers and use additional nylon washers between the cradle and chassis. Might be easier just ditching the step washers by the cradle and double heat shrinking the bolts.
I'll get to it done.
 

Gepetto

Administrator
Staff member
Joined
May 15, 2011
Messages
13,927
Location
Sterling, MA
Tagline
Old 'Arn Enthusiast
Joe, reread your posts. The bolts are not isolated from the chassis. I have more work to do there. Really need to drill the cradle to accept the step washers and use additional nylon washers between the cradle and chassis. Might be easier just ditching the step washers by the cradle and double heat shrinking the bolts.
I'll get to it done.
Hi George
That reason you mention is why most use straws for that purpose.
 

George S.

Veteran and General Yakker
Joined
Feb 18, 2020
Messages
5,019
Hi George
That reason you mention is why most use straws for that purpose.
Yes, and this issue was the most perplexing issue that dogged me when I built the two 400s.
I solved that by going to a smaller diameter bolt, 2 layers of heat shrink, and insulating washers. The bolts in my 400s float above ground.
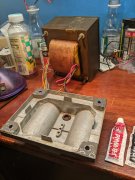
I can solve the issue here by mounting those stepped washers in the cradle and heat shrink on the bolts. But I need to drill the cradle out to do it, and it's going to make those bosses around the holes too thin and they will collapse.
So I'm going to fill those voids between the bosses and corners with JB Weld. Let it sit for a week, then drill.
I just really, really, don't like using a straw. Thanks
 

Attachments

FredR

Veteran and General Yakker
Joined
Jan 26, 2014
Messages
1,527
Location
DFW
Tagline
WTF?
Gotta love this guys review.

"That is my second purchase. I got it originally to clean my bong. Pot smokers know that the residue is thick and viscous and difficult to clean with just soap. WD-40 and similar products contains cancerous petroleum distillates and I don't want residue in my lungs. This stuff is effective and evaporates totally. Also good for cleaning gummed up cell phone buttons. I ordered tiny brushes to use with the alcohol for that."
 

George S.

Veteran and General Yakker
Joined
Feb 18, 2020
Messages
5,019
Got the KEPs nuts replaced with nylon washers and regular nuts. The cradle with JB is sanded flat. The stepped washers will fit the chassis holes but not the cradle.
Tomorrow I'll drill the cradle for the step washers and fab a strap to retain those big fat caps.
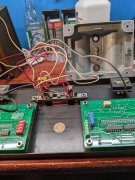
All the wiring on the meter plate is original and will be replaced. Still have further mock up to do before I decide on wiring.
Dig those Alps stepped attenuators, they cleaned up nicely. For now they're mounted as place holders. When it's time to desolder them I'll see if I can open and grease them. Looks possible.
 

Attachments

George S.

Veteran and General Yakker
Joined
Feb 18, 2020
Messages
5,019
I really like them set to bar graph. But sheesh, I only play music real loud during the summer and with the windows open when I'm working outside.
A 400 WOPL is way more amp than I need. And here I am building a 700. It'll be rare I ever see the meters really move much.
Well, I just wanted to build one and only one.
 

George S.

Veteran and General Yakker
Joined
Feb 18, 2020
Messages
5,019
Making progress. All four transformer bolts are fully floating with stepped nylon washers under the bolt heads and nuts, heat shrink in between the nylon. There's not much left of those original cradle bosses after drilling. The JB Weld makes it stronger than original.
Appears the original bridge rectifier is a 25 amp unit. Replacing it with a 1000 V 50 amp unit (KBPC5010T) that Glenn recommended on a old thread. It'll get drilled for the additional .01 uF caps. Need to look through my box of caps and see what I have.
 

Attachments

Top