You are using an out of date browser. It may not display this or other websites correctly.
You should upgrade or use an alternative browser.
You should upgrade or use an alternative browser.
Ultra-high performance low-buck phono preamp (DIY project!)
- Thread starter J!m
- Start date
J!m
Veteran and General Yakker
J!m
Veteran and General Yakker
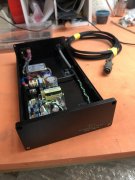
And most of the internal wiring is now done. I need to confirm which output I’m using (line or record), although it may not matter since I’m not using a volume control. I just don’t want to rework the connection.
Also need to add the balance pot. That’s it.
Then just waiting for the front plate machining to be done. But I can listen to it before that’s done. Maybe next week.
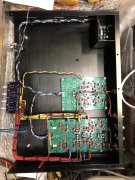
Also need to add the balance pot. That’s it.
Then just waiting for the front plate machining to be done. But I can listen to it before that’s done. Maybe next week.

- Joined
- Jan 14, 2011
- Messages
- 75,920
- Location
- Gillette, Wyo.
- Tagline
- Halfbiass...Electron Herder and Backass Woof
Nice wire discipline Jim...
mr_rye89
Veteran and General Yakker
Oh no! A switcher! This kills the audiophool.........
J!m
Veteran and General Yakker
Well, we have a mono/stereo switch- need that
We have a +10dB gain switch-need that (sometimes)
We have an elliptic filter switch- I could remove and use a jumper (always on) since it does not effect audible content.
We have a MM/MC switch to choose which board is handling things
the balance pot is only good for +4dB either way, because if you need more than that, you don’t know how to set up a cartridge.
There’s a power switch on the left as well.
Should be okay.
J!m
Veteran and General Yakker
Nice wire discipline Jim...
I know the guy who has to fix it…
Plus we need power crossing signal at 90 degrees, and as far away as possible. More tidying and dressing to be done once things are finalized.
- Joined
- Jan 14, 2011
- Messages
- 75,920
- Location
- Gillette, Wyo.
- Tagline
- Halfbiass...Electron Herder and Backass Woof
Amen bud...
J!m
Veteran and General Yakker
Oh, the tiny input signal enters the boards at the rear- wires twisted and as short as possible from input to board. Everything coming out of the boards is at line level so we’re not messing with those tiny signals off board.
All signal wire is tin plated solid copper (power is stranded). All signal connections are soldered- no connections. Switches are silver contact.
All signal wire is tin plated solid copper (power is stranded). All signal connections are soldered- no connections. Switches are silver contact.
NeverSatisfied
Chief Journeyman
Wow, that is some first class work there. Not counting your time, what do you think you will have invested in it when your complete?
J!m
Veteran and General Yakker
I figure I will have everything invested.
Just wait until you see the front panel! (I can’t wait and I designed it!)
Just wait until you see the front panel! (I can’t wait and I designed it!)
- Joined
- Jan 14, 2011
- Messages
- 75,920
- Location
- Gillette, Wyo.
- Tagline
- Halfbiass...Electron Herder and Backass Woof
Love the Amphenol connector, got a drawer full of that stuff..
NeverSatisfied
Chief Journeyman
Definitely looking sharp, can’t wait to see the finished product.I figure I will have everything invested.
Just wait until you see the front panel! (I can’t wait and I designed it!)
J!m
Veteran and General Yakker
Love the Amphenol connector, got a drawer full of that stuff..
not a lot of fun to solder them up, but still used to this day for a reason: they work.
Their ordering system makes as much sense as a snow cone cart in the Arctic, but once you understand their language, you can usually find what you need.
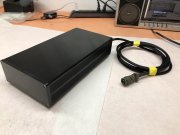
These particular ones are recycled. Gold pin bayonet mount ones. I usually go for standard silver pin and standard threads. But these were free, and seemed up to the task of carrying +15, -15, 0V and an earth ground up from the power supply.
- Joined
- Jan 14, 2011
- Messages
- 75,920
- Location
- Gillette, Wyo.
- Tagline
- Halfbiass...Electron Herder and Backass Woof
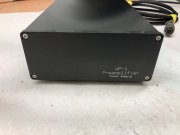
Here’s the front panel mock up.
I have to cover a knob I don’t need and add buttons…
Want to use copper for the raised panel but McMaster wants $100 for a slab of copper…
Next time try" Cut to Size Metal.com"
- Joined
- Jan 14, 2011
- Messages
- 75,920
- Location
- Gillette, Wyo.
- Tagline
- Halfbiass...Electron Herder and Backass Woof
not a lot of fun to solder them up, but still used to this day for a reason: they work.
Their ordering system makes as much sense as a snow cone cart in the Arctic, but once you understand their language, you can usually find what you need.
These particular ones are recycled. Gold pin bayonet mount ones. I usually go for standard silver pin and standard threads. But these were free, and seemed up to the task of carrying +15, -15, 0V and an earth ground up from the power supply.
Amen on all that...
J!m
Veteran and General Yakker
Front panel machine work shouldn’t be more than $400…
NeverSatisfied
Chief Journeyman
Thought you said "Low Buck" preamp.....lolFront panel machine work shouldn’t be more than $400…
J!m
Veteran and General Yakker
That is; for the expected performance
But the Chineseium build box could have been eliminated too. I know of one in a wooden box and another in a cookie tin. One is built in a recycled CD player box.
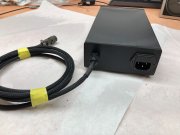
Power supply was intended to be internal but I wanted to be certain of zero extra noise. It’s a switching power supply and that could be replaced with an esoteric linear one too.
The switches and balance pot could also be eliminated.
So, it could be quite cheap but I wanted it to hold its own (appearance wise) with the other gear I have. (It may end up stealing the show!) and it could be quite a bit more too.
NeverSatisfied
Chief Journeyman
I get it, sounds good is the primary but sounds good and looks good is pinnacle.

