
You are using an out of date browser. It may not display this or other websites correctly.
You should upgrade or use an alternative browser.
You should upgrade or use an alternative browser.
Sutt's "Fugly One" WOPL Transformation
- Thread starter jbeckva
- Start date
ksrigg
Chief Journeyman
- Joined
- Jun 11, 2010
- Messages
- 6,948
- Location
- Powhatan, Virginia, United States
- Tagline
- WassupYa Mang?
Told you Ed, I'm "disabled" at the moment with one of the dummy loads blown. Got a pair of 1000 watt rated loads coming, so we'll pick up in the other thread I am working on, when they arrive from HK.
https://forums.phxaudiotape.com/threads/testing-wopls-automated-by-jer.8687/
https://forums.phxaudiotape.com/threads/testing-wopls-automated-by-jer.8687/
bill7621
Chief Journeyman
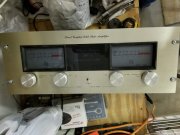
Sure is pretty. I'm sure you're going to get years of enjoyment from her.Here is BEFORE
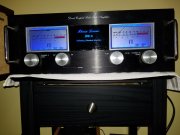
And AFTER
I think the transformer, the heat-sinks, the name badge and the knobs were the only things used in the new build....and I have some new knobs coming from China...
Another WOPL lives to fight the fight.
She ain't fugly no more!
ksrigg
Chief Journeyman
She is a beauty, for sure. Not the same amp that left here a couple of weeks ago. She is also a real brute with just effortless power and finesse. I remember when Kevin got the latest revisions done to one of his amps and we did a comparison. First we listened to a
WOPL with earlier revision boards .....and thought it couldn't sound any better than that. Next we listened to the latest revisions, I both of us had our mouths open.....muttering.......my GOD......that is not possible. The latest revisions done by Joe and built by Jerry just gobsmacked us both....and we thought the early WOPL sounded good.......but we were pretty much both flabbergasted.......could not believe how much better the amp with the latest revisions and back-planes sounded.....I was convinced.....and now have TWO 700b's and one 400 with back-planes and all the latest and greatest....and I NEED MORE.....it is just a matter of time...damn, Joe just keeps making them better and better, and Jerry just keeps building them better and better....they are better than any amp I have ever hear....by a huge margin. I sold all my Bryston gear after hearing the early revision WOPL....they are THAT GOOD....no......GREAT!
WOPL with earlier revision boards .....and thought it couldn't sound any better than that. Next we listened to the latest revisions, I both of us had our mouths open.....muttering.......my GOD......that is not possible. The latest revisions done by Joe and built by Jerry just gobsmacked us both....and we thought the early WOPL sounded good.......but we were pretty much both flabbergasted.......could not believe how much better the amp with the latest revisions and back-planes sounded.....I was convinced.....and now have TWO 700b's and one 400 with back-planes and all the latest and greatest....and I NEED MORE.....it is just a matter of time...damn, Joe just keeps making them better and better, and Jerry just keeps building them better and better....they are better than any amp I have ever hear....by a huge margin. I sold all my Bryston gear after hearing the early revision WOPL....they are THAT GOOD....no......GREAT!
You need the new chassis like Sutton now has so you can plug in any line cord that you desire...
ksrigg
Chief Journeyman
You got that right , Joe...ain't nothing like it. I have her jamming now.
Streaming from the internet is terrible. What happened to CD, SACD and analog sources? I know streaming is convenient, but it sounds terrible..
Streaming from the internet is terrible. What happened to CD, SACD and analog sources? I know streaming is convenient, but it sounds terrible..
grapplesaw
Veteran and General Yakker
ksrigg
Chief Journeyman
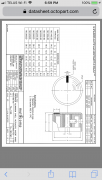
Where did you find them? I've looked and the ones I found are these, but I'm not sure exactly how they will look til they arrive..they are 38 X 22 mm and fit a 6 mm shaft .....so..........

- Joined
- Jan 14, 2011
- Messages
- 75,769
- Location
- Gillette, Wyo.
- Tagline
- Halfbiass...Electron Herder and Backass Woof
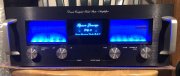
I like these polished knobs on the black face plates
OH DAYAM!!!!!!!!!
grapplesaw
Veteran and General Yakker
grapplesaw
Veteran and General Yakker
They are made by Multicomp.
Part # MC38S2D
Sometimes on eBay.
EBay #352239137268
You can buy them from $4 up if you hunt for them on the net
ksrigg
Chief Journeyman
I paid &30.38 delivered for 8 delivered.. BAD?
ksrigg
Chief Journeyman
4 bucks each
grapplesaw
Veteran and General Yakker
that is fair price4 bucks each
Where did you purchase them from
ksrigg
Chief Journeyman
" lucky.warm " is the name of the eBay Seller. He had them listed for $4.25 I think, but I had a 10% off coupon, so I got them for under four bucks each. Only thing is, I think they will take a month or so to get to the USA...Here is the item description:
38x22mm Aluminium Alloy Volume Knob for 6mm Potentiometer Shaft Silver
( 182525783244 )
I just hope they will fit the shafts.....I know they have the hex nuts....so I just hope the opening is large enough to accept work. We shall see !!
38x22mm Aluminium Alloy Volume Knob for 6mm Potentiometer Shaft Silver
( 182525783244 )
I just hope they will fit the shafts.....I know they have the hex nuts....so I just hope the opening is large enough to accept work. We shall see !!
grapplesaw
Veteran and General Yakker
Ok you will probably have to drill open the shaft hole to .250” as you have ordered 6mmthis is a very small amount to drill out Back out the set screw so your drill will not hit it and place some tape across the outside so it doesn’t get lost.
Best way is using a drill press so you keep the hole square to the knob.
You do have to keep the knob protected from scratching and denting so wrap it in masking tape making sure the face has no bumps when doing so to get a flat square surface to drill against
Good luck
Best way is using a drill press so you keep the hole square to the knob.
You do have to keep the knob protected from scratching and denting so wrap it in masking tape making sure the face has no bumps when doing so to get a flat square surface to drill against
Good luck
ksrigg
Chief Journeyman
Thank you for the excellent heads up and solution. I will follow your instructions upon receipt of the knobs. I hope they look good....I hope they tie in with the new look of the amp and go well with the Acurus preamp I am planning on using..Ok you will probably have to drill open the shaft hole to .250” as you have ordered 6mmthis is a very small amount to drill out Back out the set screw so your drill will not hit it and place some tape across the outside so it doesn’t get lost.
Best way is using a drill press so you keep the hole square to the knob.
You do have to keep the knob protected from scratching and denting so wrap it in masking tape making sure the face has no bumps when doing so to get a flat square surface to drill against
Good luck
grapplesaw
Veteran and General Yakker
Thank you for the excellent heads up and solution. I will follow your instructions upon receipt of the knobs. I hope they look good....I hope they tie in with the new look of the amp and go well with the Acurus preamp I am planning on using..
Try them on first in case the fit as is
mlucitt
Veteran and General Yakker
My thought is that with all the additional current we are demanding from these amplifiers, we should be using 3-prong plugs and grounding the chassis to mains ground (earth). 15 Amps will kill you in an instant.