PL7000S2

George S.

Veteran and General Yakker
Joined
Feb 18, 2020
Messages
5,062
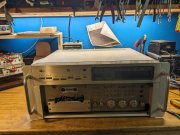
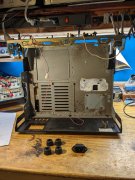
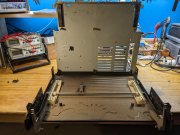
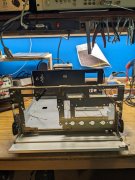
Finally got the last piece I've been hunting.
She's a little rough, but that's OK, didn't give much for her.
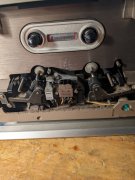
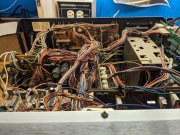
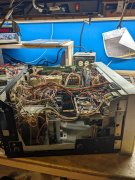
Not sure there's a complete set of boards in it, we'll see.
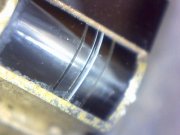
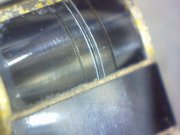
Need to finish some outside pressure washing and other chores before seeing if it's complete and has ferrite or sendust heads.
I'll setup the USB microscope and see if it's got the gap erosion issues I've read about on TapeHeads.
Hopefully this carcass is worthy of a rebuild.
Photos to come.
 

Attachments

  • PXL_20240525_145214224.jpg
    PXL_20240525_145214224.jpg
    2.6 MB · Views: 48
A very unmolested and dusty/dirty unit. Seller was in California and said it came out of long term storage there.
Ferrite heads, and they look way better than the photos I've seen of eroded and corroded gaps.
What do you all think? Are the photos good enough to tell?
 

Attachments

  • Playback Head.jpg
    Playback Head.jpg
    75.8 KB · Views: 25
  • Record Head.jpg
    Record Head.jpg
    76.8 KB · Views: 24
The drive is full of dust as is the chassis.
Original Elna caps in the power supply.
Don't see any signs it's ever been worked on.
Not going to plug it in and take a chance with those old dry caps.
 

Attachments

  • PXL_20240526_002051956.jpg
    PXL_20240526_002051956.jpg
    3 MB · Views: 30
  • PXL_20240526_002125385.jpg
    PXL_20240526_002125385.jpg
    2.7 MB · Views: 30
So been sitting here looking it over closely. A strip of micro switches has fallen loose behind the face plate. Can just see them hanging diagonally.
The capstan belt has turned to black goo, of course.
Probably close to a hundred electrolytic caps in this thing that need replaced . Motors need disassembled and lubed.
I'm going to go for it. A complete recap and rebuild looks do-able. I have all the equipment except for tapes and tension gauges.
A good long term project.
 

Attachments

  • PXL_20240526_012626890.jpg
    PXL_20240526_012626890.jpg
    3.2 MB · Views: 24
So been sitting here looking it over closely. A strip of micro switches has fallen loose behind the face plate. Can just see them hanging diagonally.
The capstan belt has turned to black goo, of course.
Probably close to a hundred electrolytic caps in this thing that need replaced . Motors need disassembled and lubed.
I'm going to go for it. A complete recap and rebuild looks do-able. I have all the equipment except for tapes and tension gauges.
A good long term project.
oy vey!
 
Looks more daunting than that Sony 3 header I have in the back room. Are you looking to hear some old tapes you have or make mix tapes?
 
Kyle, weird thing is, I don't have a single cassette tape.
Had boxes of them before XM radio. I put a XM radio in the truck and threw out all the tapes.
Can't say I've ever done a recording.
But with digital streaming now available, I can think of many tracks I'd like to record.
Main reason is, I think the model is very cool and I enjoy doing projects at the bench. Keeps me busy and learning about electronics.
 
Progress.
Tomorrow I'll disassemble the chassis further, get it clean and grease the chassis mechanisms with Lubriplate.
There's a lot going on with the face plate pivots, springs, and the associated rollers.
Then I'll get the IEC socket and Budwig feet installed.
Taking it apart was fairly straightforward. I'm not a fan of the Pioneer wire wrap method they used to build these.
Had to unsolder several coax ends, unsolder a few wire wrap posts from the board, and unwrap a couple connections. But not bad. Lots of plug in headers on the boards.
I did research the Pioneer wire wrap method and why it was used. I understand it's advantages and did strive to maintain it.
But, after 40 years of service, I'm going to solder the top wraps on every post. I think it's the proper thing to do because of the age of the unit.
 

Attachments

  • PXL_20240527_002202490.jpg
    PXL_20240527_002202490.jpg
    3.3 MB · Views: 18
The sub chassis where the face plate gets stowed. The grease is semi-solid from embedded dust.
Later y'all.
Time to break and spin a LP or two.
Later!
 

Attachments

  • PXL_20240527_010705861.jpg
    PXL_20240527_010705861.jpg
    3.2 MB · Views: 20
Ahh, yes, the gas tight seal that the proponents of wire wrapping talk about.
Special solid core wire, special posts with sharp corners.
Joe, I value your opinion.
Due to it's age, should I solder the top 2 or 3 wraps, solder the entire wrap, or just leave undisturbed wraps alone?
I really don't want to be chasing issues due to it's complexity.
It's a royal PITA to even change belts. And the service manual isn't so great.
George, if you do not plan any rework of the wires attached to the posts, it does no harm to tack the last 1 or 2 wraps to the post with solder. It makes it a bear to rework if you ever intend to rewire (doubt that is your intent).
 
Progress.
Chassis is done.
Added the IEC where a accessory socket was.
Added a AGC fuse where the Heyco grommet was.
The original Pioneer feet were missing, got the Budwig installed.
The power distribution board has the units fuse mounted on it, but I wanted a external. Fills the hole anyway.
All the hinged faceplate screws were loose when I took apart, but it's all in good shape. Cleaned up and greased, it works like new.
Time to address the transport assembly.
 

Attachments

  • PXL_20240528_150710658.jpg
    PXL_20240528_150710658.jpg
    2.7 MB · Views: 28
Back
Top