Phase Linear 3300 Series II Recap and Cleaning

NavLinear

Veteran and General Yakker
Joined
Apr 12, 2012
Messages
6,069
Location
SoCal
#1
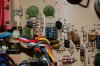
Finally my first documented audio refurbishment. I have had little time to post so there are a few days of photos that I’ll post showing my path and issues I came across while updating this beautiful piece of equipment. Thanks Lee for all your help and the nice face plate upgrade you scored.

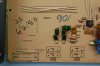
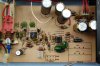
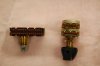
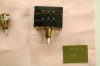
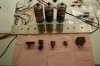
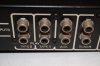
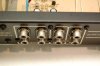
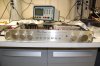
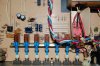
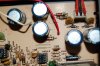
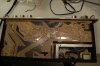
Some photos of the 3300 II before upgrades. Sorry no photos with the top or bottom on as I couldn't help myself - had to pull the lids minutes after opening the box when I received the 3300 II.

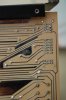
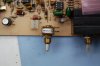
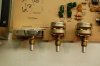
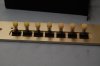
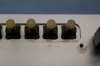
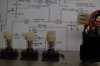
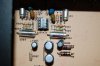
If you look closely at the trace side of the board you will see flux residue that was not cleaned from the orginal build. It is a good idea while you're in there to clean up stuff like this.
 

Attachments

NavLinear

Veteran and General Yakker
Joined
Apr 12, 2012
Messages
6,069
Location
SoCal
#2
I lifted a pad or two while removing the selector switch so be careful. Lee mentioned in several posts that these boards are a little more difficult to work on then others.

The photo "Lifted Pads" will give you a visual of where my problems were. Two of the selector switch corner pads are what lifted. These are not electrically connected to anything other than the switch and seem to be used more as a mechanical retention mechanism.

I used DeoxIT D5 to clean the pots and switches, DeoxIT Gold to protect the metal (also used as a lubricant) and DeoxIT FaderLube as an added lubricant in the selector switch.

When cleaning spray one or two 1-second bursts (DeoxIT D5 or D100) in the connector and without waiting around too long rotate the pot from one stop to the other multiple times - I did this about 50 times for each pot. Do this with all the pots and allow them to dry. I let them sit overnight (probably overkill) so you must be patient. When you use the DeoxIT Gold spray about a one second burst and rotate a couple of times as you are not cleaning this time - just spreading the protectent / lubricant. Again I let these dry overnight. The selector switch is a little stiff so I used the DeoxIT FaderLube as a lubricant. I sprayed the FaderLube in two one second bursts and rotated the knob several times to spread the lube. What a difference a little lube makes!

Lee has some great shots of where to squirt the cleaners in his thread “Absolutely Gorgeous Phase Linear 3300 Ser IIâ€:

absolutely-gorgeous-phase-linear-3300-ser-ii-t3011.html" onclick="window.open(this.href);return false;

Be very careful with the volume pot as you’ll want to slightly open it to squirt the cleaner and protectant inside the pot. Again I’ll defer to Lee’s post noted above for more details.
 

Attachments

NavLinear

Veteran and General Yakker
Joined
Apr 12, 2012
Messages
6,069
Location
SoCal
#3
For the push button switches I applied the DeoxIT D5 and DeoxIT Gold as shown in the attached drawing. These switches were left on the board and the board was tilted down with a cloth strategically placed to minimize overspray and deflected spray on the board. Again after cleaning I actuated the switches about 50 time each and allowed the switch to drain / dry overnight. I than applied a one second burst of DeoxIT Gold and actuated the switches several times to spread the protectant internally. During both processes I observed some the DeoxIT in the adjacent hole - see attached.
 

Attachments

NavLinear

Veteran and General Yakker
Joined
Apr 12, 2012
Messages
6,069
Location
SoCal
#5
Don't forget to clean the RCA jacks on the backside while in the cleaning mode. I used what was I had - an acid brush cut down for stiffness and some wooden handled cotton swabs.

I started by spraying some DeoxIT D5 on the jacks but that can get a little messy so I wound up spraying a cotton swab (Q-tip) and applying this to the outside (ground) of the jacks. I then used the acid brush to clean the jack.

I wanted to use some pipe cleaners to clean the conducter (inside) of the RCA jack but those have not come in yet. The cotton swab seemed to work well for cleaning the inside though. I used the DeoxIT D5 for cleaning and the DeoxIT Gold to preserve the jacks. I have some other Caig products on order and I'll play around with those at a later date to see how those work out.
 

Attachments

NavLinear

Veteran and General Yakker
Joined
Apr 12, 2012
Messages
6,069
Location
SoCal
#7
Larry,

If you come across a source for these let me know. I remember reading something about them but no cigar in finding them. I'll let the grandkids play with the pipe cleaners.

Thanks - Dennis
 

NavLinear

Veteran and General Yakker
Joined
Apr 12, 2012
Messages
6,069
Location
SoCal
#8
The installation of Bass, Treble, Balance and Volume pots and of course the Selector Switch can (is) a real PITA. Lee mentioned it in his thread that in addition to pad or trace lifting the alignment is fairly critical. When the face plate is installed the five pot/selector switches must line up in addition to the seven push button switches.

What I wound up doing was placing the four pots and the selector switch on the board. I used nuts on both sides of the face plate for all five pots. Not all of the pots used nuts on both sides from the factory - two or three used washers as spacers but I wanted a little more adjustment to get the overall alignment more precise. I think it worked.

The photos show all pots/selector switch with the inside nuts installed.

I then installed the face plate and adjused the inside and outside nuts to get a reasonable allignment before soldering. This got everything close but I still had to do some minor tweaks later to get the alignment more correct. PITA!
 

Attachments

NavLinear

Veteran and General Yakker
Joined
Apr 12, 2012
Messages
6,069
Location
SoCal
#12
speakerman1 said:
Nav do you have the kit with all the Caig stuff?

Larry
Larry,

I was curious about the kits but so far I've purchased the D5, Gold and FaderLube in the larger aerosal cans - a can of D100 is pending. Those small cleaning brushes look like they would work out well. Thanks for the link - my next purchase I'll include a brush or two.

Dennis
 

NavLinear

Veteran and General Yakker
Joined
Apr 12, 2012
Messages
6,069
Location
SoCal
#13
The actuators for the seven switches posed a couple of problems for me. The switches were attached to the faceplate with an adhesive that reminded of a double stick tape. Of course I removed the actuactors from the faceplate and then cleaned the plate removing the adhesive - as it was still sticky and had collected dust and such over the years.

When it came time to reassemble the faceplate including the actuators I used a double stick tape to keep things in place. I mounted the faceplate to the chassis and discovered that the tape just didn't cut it. When an actuator was pushed the body of the actuator would move away from the faceplate and the switch would not toggle. I wound up applying a small ammount of RTV to one side of the actuactor - see photo - curing this overnight and verfiying that the all of the switches worked. I guess six out of seven is not bad - but the power switch was not working well at all. Upon closer inspection the actuators were of slightly different lengths but now evrerything is glued in place. To make a long story short I discovered that if I could lengthen the actuator by a small ammount - around 0.1" or so I could get the power switch to reliably toggle.

I rooted around and found a nylon standoff and drilled it out to match the actuator and then trimmed it down and finally used a file to get the standoff to the correct length.

This is actually fun by the way.
 

Attachments

speakerman1

Honorary Forum "Larrt" (ornery too)
Joined
Jun 12, 2010
Messages
12,037
Location
OZONE ALLEY MARS (Visitor)
Tagline
Wasted Days and Wasted Nights
#14
NavLinear said:
speakerman1 said:
Nav do you have the kit with all the Caig stuff?

Larry
Larry,

I was curious about the kits but so far I've purchased the D5, Gold and FaderLube in the larger aerosal cans - a can of D100 is pending. Those small cleaning brushes look like they would work out well. Thanks for the link - my next purchase I'll include a brush or two.

Dennis
It has all of that plus some. It will last a long time.

Larry
 

laatsch55

Administrator,
Staff member
Joined
Jan 14, 2011
Messages
75,164
Location
Gillette, Wyo.
Tagline
Halfbiass...Electron Herder and Backass Woof
#15
Nice nylon fab work there Nav-Dennis. That's what was missing in my threads, what seems important enough for me to elaborate and pictulate is different from yours, ergo, a totally new "Actuator" portion---Love It!!
 

speakerman1

Honorary Forum "Larrt" (ornery too)
Joined
Jun 12, 2010
Messages
12,037
Location
OZONE ALLEY MARS (Visitor)
Tagline
Wasted Days and Wasted Nights
#18
Try MCM. I get a lot of my chemicals from them. I was using this stuff 15 to 20 years ago. I use silver connections a treat them with deoxit so it wont corrode. Better conductor.

Larry
 

NavLinear

Veteran and General Yakker
Joined
Apr 12, 2012
Messages
6,069
Location
SoCal
#19
speakerman1 said:
Here is what is in the kit. It is worth it. The D100 and the D100L are not part of it. I have fader lube somewhere over the rainbow.

Larry
This looks like a nice kit - thanks for the photo.
 

NavLinear

Veteran and General Yakker
Joined
Apr 12, 2012
Messages
6,069
Location
SoCal
#20
laatsch55 said:
Nice nylon fab work there Nav-Dennis. That's what was missing in my threads, what seems important enough for me to elaborate and pictulate is different from yours, ergo, a totally new "Actuator" portion---Love It!!
Lee - it was a PITA to get all seven of these guys working correctly at the same time.

One of the things I didn't mention in the nylon standoff post was the fact that the actuators had different spring weights. I chose the one with the greatest spring rate as the power switch actuator since it takes more force to get that switch to toggle. I'll take a photo or two of the final configuration as it changed slightly from the photos in a previous post.
 
Top