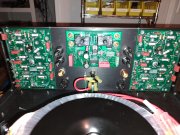
Model ONE Build - S/N 0005 & 0006

Hexis22

Chief Journeyman
Joined
Dec 28, 2022
Messages
752
Location
Wisconsin
#1
Model ONE build of S/N 005 & 006 has commenced.

Looking forward to completing a 100% White Oak designed amp. It's obvious from inspecting the PCB designs and Chassis layout that significant thought went into this design and project from Joe.

Acquiring all the components for two 1000W amps requires significant of table space for staging parts. The picture below is only the beginning, I have another table just like it for just the housing and other mechanical components.


The power supply toroids are quite large and very heavy. Below are two main toroids (one per amp) flanking a 700 transformer.


Hexis22

Chief Journeyman
Joined
Dec 28, 2022
Messages
752
Location
Wisconsin
#2
First step is assembly of all the PCB assemblies using a PanaVise. I would not want to take on this level of project without this tool.


Below are pictures of all the completed assemblies, cleaned, inspected and ready for installation:

Power Control Board


Input Control Board (one of two):


Output Relay Board


Backplane Boards (one of two):


mlucitt

Veteran and General Yakker
Joined
Jun 24, 2011
Messages
3,495
Location
Jacksonville, FL
#7
I had to do everything twice on my first Model ONE build...
I am not sure but I think the Backplane Boards may not fit over the Thermostatic Switches due to the Spade Connectors. A trivial thing.
After I had mounted my Main Capacitor Clamps, Joe reminded me to have the screw heads facing outward, gaining access to the screws after installing the Transformer Cover would be very difficult.
 

Hexis22

Chief Journeyman
Joined
Dec 28, 2022
Messages
752
Location
Wisconsin
#8
I had to do everything twice on my first Model ONE build...
I am not sure but I think the Backplane Boards may not fit over the Thermostatic Switches due to the Spade Connectors. A trivial thing.
After I had mounted my Main Capacitor Clamps, Joe reminded me to have the screw heads facing outward, gaining access to the screws after installing the Transformer Cover would be very difficult.
It’s a tight fit, but small adjustments to the switch tabs before mounting and it’s good to go.


Gepetto

Administrator
Staff member
Joined
May 15, 2011
Messages
14,057
Location
Sterling, MA
Tagline
Old 'Arn Enthusiast
#10
Thank you for the heads up!

I was planning to assemble my way from the back of the chassis wall forward before mounting the large and heavy toroid with cover (very timely input).

The Transformer and cover should be one of the first thing to get assembled. Thus the red cart on the tools list. And the chassis sides should be one of the last items installed
 

Hexis22

Chief Journeyman
Joined
Dec 28, 2022
Messages
752
Location
Wisconsin
#11
The Transformer and cover should be one of the first thing to get assembled. Thus the red cart on the tools list. And the chassis sides should be one of the last items installed
I did take the side panels off shortly after that picture.

My thinking was to complete as much as possible on the back wall for ease of access before installing the transformer and cover.

The transformer is next…

Also, I wish I would have discovered building amps on a roll cart before this build… so much better than rotating a 700 around on the bench.


Gepetto

Administrator
Staff member
Joined
May 15, 2011
Messages
14,057
Location
Sterling, MA
Tagline
Old 'Arn Enthusiast
#12
I did take the side panels off shortly after that picture.

My thinking was to complete as much as possible on the back wall for ease of access before installing the transformer and cover.

The transformer is next…

Also, I wish I would have discovered building amps on a roll cart before this build… so much better than rotating a 700 around on the bench.


Really difficult to do without a roll cart that allows you to get to anywhere you want to. That is a game changer
 
Top