Carver C1 going through rework

WOPL Sniffer

Veteran and General Yakker
Joined
Aug 10, 2015
Messages
11,226
Location
Minnie-Soda
Tagline
Screw it
#1
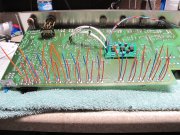
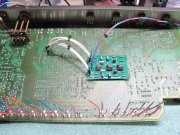
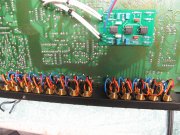
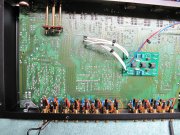
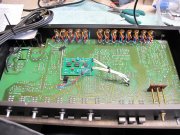
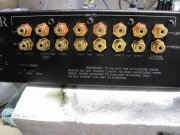
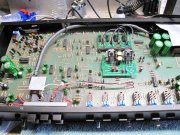
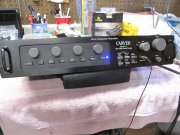
I'm taking my C1 into the shop this morning for a rework. She'll get cleaned, power supply rebuilt (with my Power Supply Kit), some new Op amps, switches cleaned and lubed, the NEW RCA kit with custom mounting plate, and a recap. I have had it in my system for a while and since I had put the new face plate on it, I decided to finish it. I think I'll put the Gundry Notch Filter on it and also put the Bonzoro EZ Gain board in it for quick gain changes of the Pre amp. I'll post some Pics later. The C-1's respond well to these upgrades and many on the other site change all the resistors to metal film (from Carbon Comps) but I have tested THAT "upgrade" and it is useless.


Perry
 

MarkWComer

Veteran and General Yakker
Joined
Nov 1, 2014
Messages
3,243
Location
Gaston, SC
Tagline
Victim of the record bug since age five
#2
Yes- will follow this thread. Next pre will be a C1 in this house!
I’m the second owner* of a 4000/II, it’s nice, but aged, and we’re all well aware of its shortcomings.

*- according to the ebay seller...
 

WOPL Sniffer

Veteran and General Yakker
Joined
Aug 10, 2015
Messages
11,226
Location
Minnie-Soda
Tagline
Screw it
#3
Got her all torn apart. Here is what I was talking about with terrible Quality Control..... Notice all the Flux which is corrosive and holds moisture. 2 killers of trons.

And some sub par soldering.


IMG_5734rs (2208 x 1656).jpg IMG_5735rs (2208 x 1656).jpg
 

WOPL Sniffer

Veteran and General Yakker
Joined
Aug 10, 2015
Messages
11,226
Location
Minnie-Soda
Tagline
Screw it
#4
Few more. All this will be stripped . I always hated the RCA's they used. We have a cool upgrade. A machined aluminum plate which holds the new RCA jacks, they in turn get wired to the board.


IMG_5736rs (2208 x 1656).jpg IMG_5737rs (2208 x 1656).jpg
 

WOPL Sniffer

Veteran and General Yakker
Joined
Aug 10, 2015
Messages
11,226
Location
Minnie-Soda
Tagline
Screw it
#5
I always condone Non-Destructive removal of components but in this case, the extra heat imposed on the board removing these monstrosities, I opt for clipping the leads, heating them to remove the leads, and then cleaning the pads. These single sided boards can be damaged by too much heat. Notice again, ALL THAT FLUX


IMG_5738rs (2208 x 1656).jpg IMG_5739rs (2208 x 1656).jpg
 

WOPL Sniffer

Veteran and General Yakker
Joined
Aug 10, 2015
Messages
11,226
Location
Minnie-Soda
Tagline
Screw it
#7
First thing to attack is the power supply circuit. It gets fresh High Quality Caps. I need to build my Power Supply board for installation inside. Space is limited so I wil attach it to the Motherboard. I've shown these regulator boards on a couple other threads. They work for most of the pre's I work on which have + and - 12VDC. I'll post some pics when I finish building the board.


IMG_5741rs (2208 x 1656).jpg
 

laatsch55

Administrator,
Staff member
Joined
Jan 14, 2011
Messages
74,216
Location
Gillette, Wyo.
Tagline
Halfbiass...Electron Herder and Backass Woof
#9
We see a lot of sub par soldering in the vintage stuff....course they employed a lot of Grandmas..
 

MarkWComer

Veteran and General Yakker
Joined
Nov 1, 2014
Messages
3,243
Location
Gaston, SC
Tagline
Victim of the record bug since age five
#10
many on the other site change all the resistors to metal film (from Carbon Comps) but I have tested THAT "upgrade" and it is useless.
Perry
Why would that be so? Most of those resistors would be 20% tolerance from that era, correct? I would expect 1% MF resistors to be far superior.
 

WOPL Sniffer

Veteran and General Yakker
Joined
Aug 10, 2015
Messages
11,226
Location
Minnie-Soda
Tagline
Screw it
#11
Why would that be so? Most of those resistors would be 20% tolerance from that era, correct? I would expect 1% MF resistors to be far superior.
Go for it. I found no difference in testing. As a matter of fact, when I put this C-1 back together, I decided to see how it sounded with the original power supply and after about 2 minutes, I didn't like it. Not just the sound but the power supply was putting out 7.5 vdc (plus and minus) and it should be 12. I installed my power supply upgrade board and it is right now rocking my living room. 20 percent???? Hell, just the PS was off by 50%.... Not any more, 12.08VDC + and -.......

If you want to do it, I'd suggest you do your baseline, recap it and whatever, and if you aren't satisfied, then do the 1% junk. You won't be able to tell and I did the testing. These units (as most Carver/PL are not even close to any specs. Especially after 40 years but you can't burn up anything with 7 volts.... Some of the advertised mods are not worth the time and effort but you'll have to experiment Mark, this is right up your alley. Do one mod, and test it, do another and test it. You'll find out what was a wast of time. Skip the Brown Dog shit. It made absolutely no difference on the test station. I buy fresh TI RC4136 opamps and replace all of them (9?), and that makes all the difference.
 

WOPL Sniffer

Veteran and General Yakker
Joined
Aug 10, 2015
Messages
11,226
Location
Minnie-Soda
Tagline
Screw it
#12
If you had a 100 ohm resistor and it measured 10-20% off, it wouldn't do shit to a preamp when the power supply is off buy 50%. Even though they may be built with 20% resistors, I have RARELY found them off that far. Experiment with your C-1..... They are simple and if you screwed anything up, they are easy to troubleshoot and fix.
 

WOPL Sniffer

Veteran and General Yakker
Joined
Aug 10, 2015
Messages
11,226
Location
Minnie-Soda
Tagline
Screw it
#13
Here is a couple more shots. I spent about 25 hours on the mods and tests and playing.

She even got a new power cord. It took many hours just on the RCA upgrade. Now that in itself is an improvement as the shitty originals like to fall apart. The bean counters saved a bunch of money using those plastic POS.

You may or may not notice that I used some Non-Polar caps, and removed some and used regular ones. Couldn't tell the difference either way. Experimentation is the name of the game.


IMG_5743rs (2208 x 1656).jpg IMG_5744rs (2208 x 1656).jpg IMG_5745rs (2208 x 1656).jpg IMG_5746rs (2208 x 1656).jpg IMG_5747rs (2208 x 1656).jpg
 

MarkWComer

Veteran and General Yakker
Joined
Nov 1, 2014
Messages
3,243
Location
Gaston, SC
Tagline
Victim of the record bug since age five
#16
Do you have a shopping list for all this stuff?
Don’t have a C1 in my hands yet, but it will be the next box I buy.
 

WOPL Sniffer

Veteran and General Yakker
Joined
Aug 10, 2015
Messages
11,226
Location
Minnie-Soda
Tagline
Screw it
#17
Do you have a shopping list for all this stuff?
Don’t have a C1 in my hands yet, but it will be the next box I buy.
I don't Mark. There is a thread over on the Carver site which has the list in PDF so you can use it to order from Mouser. It also has the directions of the "BillD" Mod (Which I didn't use since some of it is lame). There are also a couple of the guys there that have the C1/C11 machined RCA plate (Like $30). I had all the stuff in my inventory. You need to read the documentation to see all the Mods all rolled into one and do the portions you want. Like I said, I skip the 1% resistor change, and the RC4136/Brown Dog upgrade (Even the author, Bill D said he couldn't tell if the difference between the 4136 and the Brown Dog adaptor). You can't tell that to them guys over there. They took his word that the Brown Dog was part of the "Mod" but they refused to read the part about Bill also saying he didn't really know if that $60 mod for 2 opamps really made a difference (his testing showed it was Snake Oil). I also used my Gain Board on it, the Gundry Filter, and my Power Supply Board so anything in there dealing those sections of the mod were skipped. I have done so many of these that I don't really go by the Mod documentation.

My Preamp Power Supply runs at a cool 104 degrees F (measured with my Laser Thermometer), temp taken @12" on the face of the 7812/7912 Regulators. I think they are good to about 180 Degrees, maybe more if you shop and buy the best regulators you can find. Some will take 220 degrees or more. My truck is hotter than that on the dash right now.
 

WOPL Sniffer

Veteran and General Yakker
Joined
Aug 10, 2015
Messages
11,226
Location
Minnie-Soda
Tagline
Screw it
#18
I believe, the last C-1 I did for a customer, cost him about $900 and the majority of it was labor. I spend more than 20 hours just in time. Parts ran about $200-$250 (I replace ALL the Op Amps (using sockets for easy Opamp experimentation), all the E caps, The mod has you change most of the non electrolytics too and I skip most of that too. Whens the last time you seen a Non E cap go bad??? Although I do replace some of the bypass caps with the good stuff. It takes 6 hours alone to build the PS Board's, the Gundry Filter, and the EZ Gain. There isn't alot of room in the C-1 but adding capacitance to the Power Supply is easy using both sides of the C-1 mortherboard like I did.
 

WOPL Sniffer

Veteran and General Yakker
Joined
Aug 10, 2015
Messages
11,226
Location
Minnie-Soda
Tagline
Screw it
#19
Oh, and the blue LED on the front of my C-1 indicates a BillD mod since that was part of the mods. If I added the time to change out 150 plus resistors, it would drive the labor up another 6-10 hours.
 

WOPL Sniffer

Veteran and General Yakker
Joined
Aug 10, 2015
Messages
11,226
Location
Minnie-Soda
Tagline
Screw it
#20
Although I have been able to get the Noise Floor on the C-1 down to awesome numbers, The 4000t is by far a way better Pre amp with more bells and whistles. The C-1 (and the C-2 for that matter) are no frills pre's and respond well to the mods but you can't beat the 4000t for looks and features. Skip the Carver C-4000 if you can since the rear speaker amp and crappy power supply adds to the complexities when upgrading. Some of the transistors in the rear amp section of the C-4000 are obsolete and replacements of them with more modern transistors makes for some "fun" since you have to turn some of them 180 degrees to get the correct pin outs. "Swizzling" the pins as Joe calls it.
 
Top