GeorgeP
Journeyman
- Joined
- Mar 22, 2023
- Messages
- 131
1. Start with the relay board to save speakers, in case the amp fails. Then if an upgrade goes wrong, no speaker loss. Make up a good load box, don't use your speakers doing mods. I just built a nice one... but just start with no load, then connect the 300W 8 Ohms resistors on a piece of wood (easy). Then you can do one channel at a time at 4 ohms, putting them in parallel. Use the series connected 100W lamp to limit the power, in case of a failure...no flames!here we go...unit is near pristine...listening to it now...
very happy with the purchase...
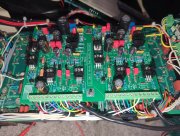
looks like the 400c board
clamp caps on power supply...
rectifier on the side too...
pl18 light board with 4 small lamps in the meters...
tell me what you think???
where to start??
2. Then, Replace the Control board, if that's a problem, the outputs getting replaced next anyway.
3. Then do the two input big cap mod, and replace the bridge rectifier for the higher current version.
4. Last but very important, replace the output devices for the new more superior ones.
5. Then do the cosmetics, meter boards etc... Working good, is better than looking good!
6. I would add the DC blocks at the input, and volume control's. Add a power switch to the front. Bring the relay board LED to the front panel...then you always know the offset and balance is correct, and a nice "ON" indicator that all is fine.
Have fun, be patient, and you will have a great amplifier.
")