PL2000 LED driver

George S.

Veteran and General Yakker
Joined
Feb 18, 2020
Messages
5,062
Hoping someone can help me with this as I spent all week looking at this and can't solve it. With the preamp on, the LED never lights, otherwise all functions work and sounds great.
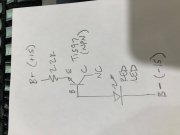
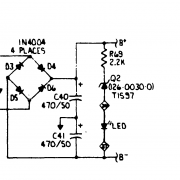
I don't understand why they used 2 legs of a transistor, the LED, and put it between B+ and B-.
Since the Ground, B+, B- "rails" run directly along the front of the board right beside this circuit, I'm thinking I just going to rewire the LED between the ground and B+ with the appropriate voltage dropping resistor for the LED which is simple to calculate.
And, yeah, the LED is good, pulled it and powered it up with a little breadboard variable power supply, bright at 2.5 VDC.
What do you all think? PXL_20210103_150026076.jpg
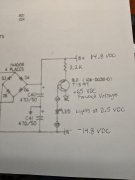
 
They used a transistor as a zener diode, sketchy but in the day it kinda worked. To cheap to purchase a zener for this application.

Jumper around the transistor and put a 2.7K 1/2W resistor in there.
 
They used a transistor as a zener diode, sketchy but in the day it kinda worked. To cheap to purchase a zener for this application.

Jumper around the transistor and put a 2.7K 1/2W resistor in there.
In place of the 2.2k?
 
Got it, thanks. Added a 500 in series with the 2.2 for 2.7 for now. Wife says time to eat. I'll update how it goes. Thanks Joe, I really appreciate it.
 
The poor man's zener for low current applications can be formed using the NPN TIS97 with its emitter connected to the plus voltage (zener cathode) and the base connected to the minus side voltage. This junction will break over somewhere around 6.8V, thus looks like a 6.8V zener diode.

That is how they had it configured in the PL circuit. They probably had a shitload of TIS97s and did not want to spring for a real zener diode.Zener Diode.jpg
 
Last edited:
Joe, you solved this riddle. But how? Calculating resistance to add to a LED circuit is easy if there is a ground and 15 VDC source.
In this case there is +15 and -15 on both sides of the LED. I am lacking the understanding of a fundamental here.
 

Attachments

  • PXL_20210103_205555399.jpg
    PXL_20210103_205555399.jpg
    3.4 MB · Views: 7
I set the LED current at 10 mA and you said you had ((14.9V + 14.9V) - 2.5V)/0.010 = 2700 ohms rough and tough.

Typical rated LED current is 20mA but you don't want a pilot light that bright so I picked half of that.
 
I set the LED current at 10 mA and you said you had ((14.9V + 14.9V) - 2.5V)/0.010 = 2700 ohms rough and tough.

Typical rated LED current is 20mA but you don't want a pilot light that bright so I picked half of that.
Adding those voltages together is what I was missing. The center tap, B+, B-, are all new to me. First exposure to them is when I built the amps, and now updating the preamp. Coming from a background with experience in automotive electric I've had no such experience. Thank you.
 
My version of the manual actually shows a zener. I fail to see the need for a zener in the first place.

View attachment 47111
Yeah, I saw that also on the S1 schematic. But, underneath it says TIS97. I am so happy Joe solved the issue and even happier to hear you say it's not needed. I put the preamp back in service and it's working great. Thanks.
 
My version of the manual actually shows a zener. I fail to see the need for a zener in the first place.

View attachment 47111

It is a zener made from a TIS97 Don. Note in the video that the collector lead is cut off of the TIS97. You can see its location as Q2 and the wire leads leading up to the LED. Will post AVI file later after I get that to be an allowed video type.
 
Last edited:
Back
Top