I read the entire thread, just amazing. What a journey! Keep the info coming. Thanks.
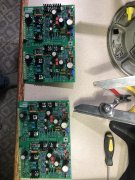
I got some heaven TO-3 bases for this build. They take a #6-32 screw so useable to Allen cap screws. I put 1/8” long nylon bushings in the bolt holes as extra safety against a screw shifting and causing a ground.
i have started the neg rail layout. I am using some 5 watt Panasonic emitter resistors. Added 1 ohm subber resistors on the base connection to each output.
View attachment 57708View attachment 57709View attachment 57710
SOLD on the Allen cap screws! Really liked the Beauty Shot of all the TO-3 output devices mounted on the heat sink. Most folks won't even see it, others will dismiss as unnecessary extra effort...but for me it demonstrates that this is a 'next level' restoration/modification effort.
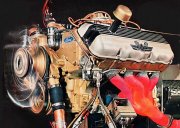
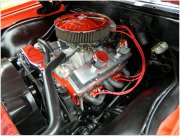
It's all in the attention to detail, whether it's a telephoto camera lens, amplifier, or even an internal combustion engine.
If you will allow me to jump hobbies for a second to illustrate my point, here's a cost-constrained engine bay that a good friend of mine asked me to help sort out. It is a Hugger Orange '70 Chevelle, and it had a 383ci stroker that, with the best of intentions, was built exactly wrong for the street. And it was dirty. And the engine bay was full of a distracting, tired/hacked wiring harness that detracted from the viewer's focus.
So that's the back story. To get back to the 6-32 screw thing, one thing I absolutely hate in the car hobby is a nice car, with a decent engine...and the header gaskets are blown. To me, it's one of those 'fingernails on the blackboard' thing...an order of magnitude worse! :0)
The permanent fix? When I put this engine together, I cheated & employed a simple practice that I was taught to use when working on aircraft -- in specific situations where it would be *bad juju* if the stuff I was installing were to come loose in flight. (!)
That's right,
safety wire. If you take a close look where the exhaust header is bolted to the cylinder head you can see my handiwork. And since that car was finished ~7 years ago, the headers have never loosened. (You wire it so that in order for one bolt to loosen, it would have to actually
tighten the partner it's wired to, and vice-versa.) Therefore, they are both effectively frozen in place...unless a human intervenes, and cuts the safety wire during maintenance down the road.
NOTE: On header gaskets, you don't safety wire them immediately - instead, you thermal cycle > tighten > thermal cycle > tighten...and repeat, until everything quits moving...and *then* you safety wire it. (usually takes 3-5 thermal cycles, about a week once the car is on the road.)
Anyway, as long as the bolts stay tight, the header flange keeps the gasket against the cylinder head, and this ensures that this whole assembly stays pretty close to the temperature of the coolant in the water jacket. (Much cooler than the hot exhaust gasses.) And as long as you keep the header gaskets at/near the temperature of the coolant in the water jacket, they don't burn/leak/get noisy/make me sad.
****
Back to your D500/Allen cap screw tip.
Thank you! You just saved me a boatload of time with my recreating the wheel on this small, but (important to me) step.
Very cool -- and those TO-3 output devices will certainly stay that way...

")