You are using an out of date browser. It may not display this or other websites correctly.
You should upgrade or use an alternative browser.
You should upgrade or use an alternative browser.
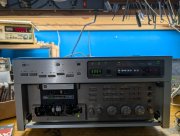
PL7000S2
- Thread starter George S.
- Start date
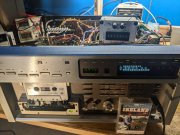
Making progress.
Using a 7 decade resistor substitution box to dial in the playback head parallel LCR circuit damping.
I'm finally understanding a little about how to match heads to the deck.
Problem is magnetic heads aren't ideal inductors and the on-line calculators give poor results. Very little info out there about actually matching the head.
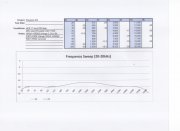
The unit has a nice flat frequency response now out to 16 KHz, then falls due to the tape, not the electronics.
Pretty damn happy with a 15K and 330pF parallel with the playback head.
But I'm going to try a 220 pF and shift the heads resonate frequency up north another 5 kHz, then calculate the damping resistor again with the decade box.
Need to test that before settling on final values.
Listening to a "all the best from Ireland" tape on headphones.
Sounds damn good,
Need to order some 220 pF caps. Later.
Attachments
- Joined
- Jan 14, 2011
- Messages
- 75,871
- Location
- Gillette, Wyo.
- Tagline
- Halfbiass...Electron Herder and Backass Woof
Quite the project still George...I am still thoroughly impressed.
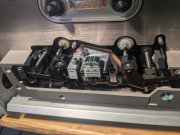
Raised the head height with a hard paper shim.
Had some erratic high frequency distortion on the right channel and a somewhat lower signal amplitude. All fixed with the shim.
Read that it's common for Pioneer heads to be mounted slightly low. Sure was the case here with the replacement head.
Also removed the heads tape guide, it's not needed
.
The tape guide is attached to the left pinch roller and the entire pinch roller assembly adjusts the tapes tracking across the heads.
Attachments
- Joined
- Jan 14, 2011
- Messages
- 75,871
- Location
- Gillette, Wyo.
- Tagline
- Halfbiass...Electron Herder and Backass Woof
Excellent George!!
George, your wife is getting jealous...Raised the head height with a hard paper shim.
Had some erratic high frequency distortion on the right channel and a somewhat lower signal amplitude. All fixed with the shim.
Read that it's common for Pioneer heads to be mounted slightly low. Sure was the case here with the replacement head.
Also removed the heads tape guide, it's not needed
.
The tape guide is attached to the left pinch roller and the entire pinch roller assembly adjusts the tapes tracking across the heads.
derek92994
Veteran and General Yakker
Also removed the heads tape guide, it's not needed
.
The tape guide is attached to the left pinch roller and the entire pinch roller assembly adjusts the tapes tracking across the heads.
I don't know why manufactures didn't install pressure pad lifters on play/rec heads in a dual capstan transport, it seems to me the pressure pad is not needed as the dual capstan and back tension provides all that is required for stable tape tracking. I have done tests by removing the pressure pad and playing the tape in a dual capstan deck that does not have a pad lifter. The heads would surely last a lot longer without the pressure pad.
derek92994
Veteran and General Yakker
The HP Magnetic Tape Recording Handbook.
Some super detailed info there, I couldn't stop reading it. I didn't understand it all but still a great read.
Haven't done much to with this lately.
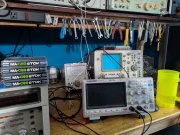
The Microscan calibrates nicely to TDK D and SA tapes, but fails on the metal MA due to low output to the Microscan board,
Clearly have a level issue with the tape selector switched to metal.
Was a good point to take a break from this.
Just got around to picking up four more MA-C90 tapes to verify if my one MA is good or bad.
Will hopefully get back to this after a home renovation project that's underway.
Attachments
J!m
Veteran and General Yakker
I can't say for the MA tapes, but there was a distinct change in the SA tapes between the early ones (like your MA labels) and the later ones. Color of the tape itself is clearly different, and they calibrate quite differently as well. Early tape is chocolate brown, and later tape is dark chocolate, almost black-brown on the SA.
MA may be the same across the board forever, but thought I'd mention this in case you were not aware.
MA may be the same across the board forever, but thought I'd mention this in case you were not aware.
Taking a short break from home renovation while drywall joint compound dries.
Want to try a better head before I take this further.
Got a Tascam 122 MkIII head from a electronics recycler.
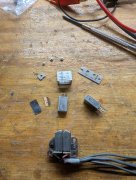
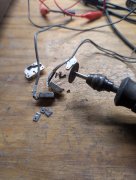
The original head, disassembled, and the Teac Tascam head.
Note the bronze shim. It sits directly under the "Ferrite" front logo and is where most all of the thread locker was located. I supported the square body with sharp corner oak blocks and the heads tapped right out with a small punch and tiny hammer.
Attachments
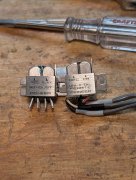
A very nice fit with the brass shim in place. Will be very easy to Loctite these in place.
Photo shows the heads pushed all the way up for maximum penetration, compared to the NOS Sendust beside it.
Nice to have that adjustability when using the gauge to set it up.
Head height of the tape track looks to be very close and the gauge will confirm.
Later y'all. Time to head back to the gypsum mines.
Lets resurrect these old Pioneer decks!!!
Attachments
J!m
Veteran and General Yakker
Those are decent heads too!
Waiting on some flooring to ship out of Dalton GA for the house, so back on the bench after a long break.
All four TDK MA-C90 tapes I recently picked up complete processing on the Microscan system with no errors.
So, TDK D, SA, and MA test tapes now very reliably process, every single time.
The Sony Duad Fe-Cr immediately fails to auto bias, it may well be bad as well as the earlier MA tape I was using.
Later I'll try manually biasing them, and see.
The four TDK MA have some nice jazz on them that I've been enjoying with headphones, sounds very good, but the test equipment shows there's room for high frequency improvement in the playback EQ.
So, the playback EQ.
These NOS Sendust heads I'm using were made for earlier machines than the late production CT-A1 which used Sendust Ribbon heads.
Going to try that Tascam head and see what it gets me.
Decided I'll anchor that sandwich head in the square barrel with clear finger nail polish.
Attachments
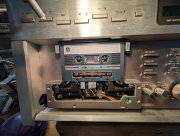
Got the Tascam head installed.
Have a nice tape path across the head, matching the original light wear marks on this used head.
The erase head has always been slightly offset , guess it's alignment isn't super critical. Not gonna worry about it at this point.
That hard drive platter mirror sure works well, easy to see the path and any tape curling.
I'll set azimuth and restart alignment testing later.
Need to get to work making my baseboards by ripping 2x4's into 3/4 x 3 1/2's. The Craftsman moulding cutters will put a nice 1/4 round on the top edge.
Attachments
J!m
Veteran and General Yakker
Wy not just buy 1X4s? Those 2X4s are worth their weight in aluminum...
EDIT- and do you have low ceilings? 3-1/2" base board is not very tall at all. Even with a base cap molding running over the top (exactly what's in my house). Once the base shoe is installed the reveal will be quite small. I suggest 1x6 for a 5-1/2" height (or so). Then the 3/4" base shoe still reveals 4-3/4" clear. (don't ease the edge of the 1x6- leave it sharp) You can run door casement to the floor or run with a plinth slightly taller than the full height of the baseboard and cap. I miter my base shoe at 22.5 degrees where the base meets the casement(s) as I do not have plinths. With hefty enough plinths, (usually reserved for large rooms) the base shoe can terminate into the side of the plinth. This is very fast and easy to construct and looks great when done.
EDIT- and do you have low ceilings? 3-1/2" base board is not very tall at all. Even with a base cap molding running over the top (exactly what's in my house). Once the base shoe is installed the reveal will be quite small. I suggest 1x6 for a 5-1/2" height (or so). Then the 3/4" base shoe still reveals 4-3/4" clear. (don't ease the edge of the 1x6- leave it sharp) You can run door casement to the floor or run with a plinth slightly taller than the full height of the baseboard and cap. I miter my base shoe at 22.5 degrees where the base meets the casement(s) as I do not have plinths. With hefty enough plinths, (usually reserved for large rooms) the base shoe can terminate into the side of the plinth. This is very fast and easy to construct and looks great when done.
Last edited:

