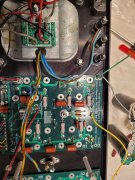
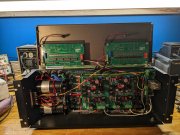
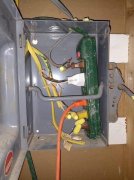
New PL 400 Series II build

Wombat

New Around These Parts
Joined
Mar 31, 2023
Messages
41
#1
Thought I would start a new thread. I could use some assistance with the wiring from the transformer, IEC outlet, and the thermal switch. I got that the brown and blue wires go to the shell connection on the fuse next to the IEC but I could use some help on the others. Not the back planes or PL 14-20, as I have instructions for them Maybe a picture? Thanks in advance.
 

Attachments

Gepetto

Administrator
Staff member
Joined
May 15, 2011
Messages
13,944
Location
Sterling, MA
Tagline
Old 'Arn Enthusiast
#2
Thought I would start a new thread. I could use some assistance with the wiring from the transformer, IEC outlet, and the thermal switch. I got that the brown and blue wires go to the shell connection on the fuse next to the IEC but I could use some help on the others. Not the back planes or PL 14-20, as I have instructions for them Maybe a picture? Thanks in advance.
I think I sent you the detailed slide show Don...
 

Wombat

New Around These Parts
Joined
Mar 31, 2023
Messages
41
#3
The detailed slide show is great, but the wires are not colored the same. I think the slide show is for a 400 series one. I also have the double winding transformer. Thanks!
 

George S.

Veteran and General Yakker
Joined
Feb 18, 2020
Messages
5,022
#4
I've tested several dual primary transformers for lowest noise wiring configuration. Make the 2 striped primary wires LINE, and the 2 solid primary wires NEUTRAL.
The line and neutral markings should be on the IEC socket by the solder lugs. Follow Joe's excellent slide show.
Treat the two striped wires as one, and the two solid wires as one, for 110-120 VAC operation. For 220-240 VAC, one striped gets joined to one solid.
Hope this helps.
Right now your at the difficult part of the build, figuring out how to run the wiring. Take your time and don't rush it.
Basically, Line comes off the IEC to the tip of the main fuse holder. Then from the fuse holder shell to the thermo breaker, then back to the transformer line primary wire, or two striped wires in your case.
Your two solid neutral wires go directly to the IEC neutral lug.
Some of us use a 700 style terminal strip for the transformer connections on 400 builds, but it's not a requirement.
 

Attachments

Wombat

New Around These Parts
Joined
Mar 31, 2023
Messages
41
#6
I've tested several dual primary transformers for lowest noise wiring configuration. Make the 2 striped primary wires LINE, and the 2 solid primary wires NEUTRAL.
The line and neutral markings should be on the IEC socket by the solder lugs. Follow Joe's excellent slide show.
Treat the two striped wires as one, and the two solid wires as one, for 110-120 VAC operation. For 220-240 VAC, one striped gets joined to one solid.
Hope this helps.
Right now your at the difficult part of the build, figuring out how to run the wiring. Take your time and don't rush it.
Basically, Line comes off the IEC to the tip of the main fuse holder. Then from the fuse holder shell to the thermo breaker, then back to the transformer line primary wire, or two striped wires in your case.
Your two solid neutral wires go directly to the IEC neutral lug.
Some of us use a 700 style terminal strip for the transformer connections on 400 builds, but it's not a requirement.


Thanks, that helps a lot. Have Eric's pictures saved also. Going very slowly as there is no rush for this.
 

mlucitt

Veteran and General Yakker
Joined
Jun 24, 2011
Messages
3,469
Location
Jacksonville, FL
#7
Some of us use a 700 style terminal strip for the transformer connections on 400 builds, but it's not a requirement.
For the PL400 Series II with the Dual Primary, I would think this is an excellent idea. Unless you install a 120V/240V Voltage Supply Switch, as I do for my International customers. Be mindful of the clearance for the LED Meters before drilling into the side of the Chassis. Don't ask me how I know this...
 

Wombat

New Around These Parts
Joined
Mar 31, 2023
Messages
41
#8
Excellent idea - about two hours ago I might have done it! Also, I received a parts bag that contains 8 nylon washers and 8 flat washers. Due to my limited abilities, I can't figure out where these go. If they are power transistor related, I would think there would 32. Labeled as Assembly Aid hardware. Heat sinks are on. Thanks!
 

Gepetto

Administrator
Staff member
Joined
May 15, 2011
Messages
13,944
Location
Sterling, MA
Tagline
Old 'Arn Enthusiast
#9
Excellent idea - about two hours ago I might have done it! Also, I received a parts bag that contains 8 nylon washers and 8 flat washers. Due to my limited abilities, I can't figure out where these go. If they are power transistor related, I would think there would 32. Labeled as Assembly Aid hardware. Heat sinks are on. Thanks!
They are assembly aid hardware, helps align the backplanes while only the bottom transistor row is in...

I just sent you a ton of documentation Don.
 

WOPL Sniffer

Veteran and General Yakker
Joined
Aug 10, 2015
Messages
11,522
Location
Minnie-Soda
Tagline
Screw it
#11
Excellent idea - about two hours ago I might have done it! Also, I received a parts bag that contains 8 nylon washers and 8 flat washers. Due to my limited abilities, I can't figure out where these go. If they are power transistor related, I would think there would 32. Labeled as Assembly Aid hardware. Heat sinks are on. Thanks!

You gots to do some more reading man. Quit being in a hurry. Joe's docs are excellent and are better than the average dudes comprehension. READ READ READ and then look at all the pics and then read some more.
 

Wombat

New Around These Parts
Joined
Mar 31, 2023
Messages
41
#13
What's the consensus for the transistor bolts? Red Locktite or JB Weld? Sorry, I will try and be serious, but it is a very heavy lift for me. Build on hold until I get my torque screwdriver back. Never "loan" tools. Apparently, they are also useful for adjusting things on Second Amendment items.
 

Gepetto

Administrator
Staff member
Joined
May 15, 2011
Messages
13,944
Location
Sterling, MA
Tagline
Old 'Arn Enthusiast
#14
What's the consensus for the transistor bolts? Red Locktite or JB Weld? Sorry, I will try and be serious, but it is a very heavy lift for me. Build on hold until I get my torque screwdriver back. Never "loan" tools. Apparently, they are also useful for adjusting things on Second Amendment items.
You should not install all the output to start out Don. Recommend you follow the bring up instructions
 

Wombat

New Around These Parts
Joined
Mar 31, 2023
Messages
41
#15
Doing exactly that. I will try to bring my posts back into line with what I am actually doing. Bottom row finger tight. Can't torque them so I will have to suffer with the McIntosh today.
 

George S.

Veteran and General Yakker
Joined
Feb 18, 2020
Messages
5,022
#16
I run a tap through the PEM nuts to "chase" the threads, lube the socket head bolt threads with a very conservative amount of synthetic bicycle grease, and very carefully and evenly snug the bolts until the silpad edge begins to cup or curl. I watch very closely with a Optivisor magnifying headset.
They just get snugged, not tightened. Once the silpad begins to curl, stop, no tighter.
 

Wombat

New Around These Parts
Joined
Mar 31, 2023
Messages
41
#17
I have seen 7 inch pounds and 4-5 referenced as torque specs. I think I will do 6 and watch for curling. Still waiting on return of my torque screwdriver. Hauled out my old variac. Forgot it is coal powered.
 

George S.

Veteran and General Yakker
Joined
Feb 18, 2020
Messages
5,022
#18
Yup, they just get barely snugged, no more. I get as close as I can to eye the silpad edge with the headset magnification.
To properly torque inch pounds, perfect threads and alignment are needed. Never had a issue with alignment, but some of those PEM nut threads have been slightly rough. I feel better doing it without a torque driver and using sight and a careful light hand. Just my personal feelings about it. It doesn't take much at all to "just" snug them and slightly curl the silpad edge.
 

Wombat

New Around These Parts
Joined
Mar 31, 2023
Messages
41
#20
Going back and triple checking my wiring. Is there a diagram showing the wire connections from the back planes to the Phoenix
Connectors on the PL 14-20? I have wired them according to pictures posted for two builds. My PL 14-20 was converted from quasi to full. I have instructions for the quasi connections but would like them for the full as one more check. Thanks, and have a great 4th everybody!
 
Top