M300 Gauge Clone

George S.

Veteran and General Yakker
Joined
Feb 18, 2020
Messages
5,033
#1
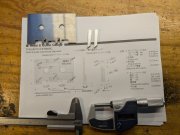
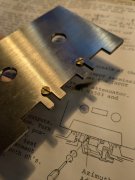
Got the gauge measured.
The plate is slightly undersized, and the 38.1 mm long feeler gauges slightly oversized in thickness, perfect length.
Stacked for use, they're approximately .001 mm oversized, if I use averaged plate thickness. But this will slightly vary across the plate.
Looks like they're aware of the tolerances and matching the pieces, or perhaps just luck.
The plate is nonmagnetic stainless, the feelers are aluminum.
Definitely not commercial/industrial quality, but it'll work very well for what I'm doing.
 

Attachments

Last edited:

George S.

Veteran and General Yakker
Joined
Feb 18, 2020
Messages
5,033
#2
I'm not sure what the brass screws are for.
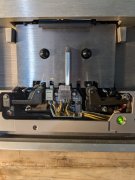
I put dabs of grease on the screw heads and inserted the plate into the deck.
The screw heads don't touch the deck. Maybe they are contact points for another type of deck?
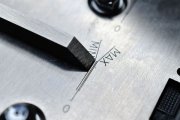
No marks for head insertion depth are engraved on the plate.
That's OK in this case. I made a pencil mark as a reference.
 

Attachments

J!m

Veteran and General Yakker
Joined
Dec 24, 2019
Messages
10,831
Location
Connecticut
Tagline
BOT
#3
I don't see any tolerance on the first drawing... That's the problem with reverse-engineering: you don't know if what you are referencing (copying) is at mid-tolerance, or top/bottom of allowable tolerance.
 

George S.

Veteran and General Yakker
Joined
Feb 18, 2020
Messages
5,033
#4
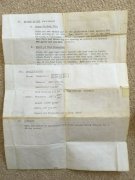
They talked about tolerances in threads on TH. I'll have to go back and look, but thought the optimum thickness was 2.445 mm, which is given for dimension A.
Then it states a flatness of 0.04 mm that I assume is + or -.
I do remember seeing a post about the final dimensions everyone agreed on for producing a reproduction, but can't find it.
I figure Abex of Japan had a good handle on this at the time, so that's the piece the Chinese would clone. Hence my comparing the clone to the Abex.
Being that this is old analog audio, with huge tolerances in cassette shells, wells, and transports, I see the M300 gauge as a rather crude device for initial setup.
Nakamichi gauges and jigs I've read about are a different matter.
 
Joined
Jun 13, 2024
Messages
441
Location
Peoples Republic of Vleuten
#6
I sought to have a batch made back around the beginning of summer.
However, I couldn't find a machine shop who would commit to the specs in my RFQ which used the original IT specs to replicate the M300 gauge. Not even from my old neighbour Henk-Jan who makes stuff for the aerospace industry. He obvs has bigger fish to fry, the selfish fkr. :D

I posted about it on TH and ofc the thread got closed out uneccessarily. I could have updated it if I'd found a shop eventually but fkd if I'll bother posting about it there if I ever do.

I think the biggest challenge for any machine shop is to not have the gauge go out of spec during machining, which is why the original is made in a two-piece configuration.
It should be relatively easier to fab now than it was back in the 70's for any competent shop. Understanding how steel can change when machining is essential knowledge to have in order to keep tolerances in check.
One important thing I learned from the episode was that it's probably a lot more convenient to source pre-flatted steel rather than pay for expensive milling/machining time. Pre-hardened/flat steel plates would be ideal for this application and will just need 3 holes milling out in both parts and forming and finishing.

In any case that's one of the better Chinesium gauges I've seen. Better than the ones I bought to compare with the IT specs - they were completely usueless.
How much did it cost and where from ?

DSC_0362_1_1.JPG


Flatness is usually total, not +/-. Like TIR.
.
There's usually a tolerance for everything @J!m. In the case of the M300 it's +/- 0.002".
Going further, that also becomes a cumulative tolerance when used in concert with the feeler gauge as it too has its' own dimensional tolerances.

IT M-300 gauge specifications.jpg
 
Last edited:
Joined
Jun 13, 2024
Messages
441
Location
Peoples Republic of Vleuten
#8
Chris, ordered this one before I left for vacation.
https://a.aliexpress.com/_mru6R7K
(2 sold)
One of them was you. lol.

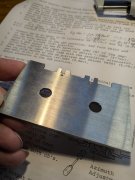
Well, I haven't seen the Chinese gauges with 2 brass screws before. What purpose do they serve?
The 3 screws on the IT-M300 are to fasten the 2 component parts togther. I can't see what purpose the 2 screws on this one perform, apart from making it look like it's made from 2 parts, which it isn't.


I had to chuckle at this typical Chinese word-salad:
'Magnetic head is engraved on the measuring plate for reliable measurement'
Yeah, that's gonna make it really reliable, lol. And just exactly which measurement are we referring to there??

To verify flatness George, you won't be able to do it with calipers - you would need a decent height-table and measure accross 8/9 points. to get a half-reliable measurement.

I'd propose this one is probably as un-trustworthy as the ones I bought previously.
Use/trust at your peril!


EDIT:
Hang on a minute, is it made of 2 parts or not? I can't really tell.
Looking a tthe dimensional diagram they supplied makes it look like it might be when looking at that sectional view. However, there's no A-A section indication anywhere on the plan view.

Can you clarify? Photo of the backside would help...?


EDIT No.2:
Oh Jesus, it gets worse - they just re-printed the ABEX tape drawing (including the ABEX name!!) and didn't even bother re-hashing it for their own purposes.
It has totally different details around the capstan/head cutouts and holes.
Drrrp

Edit No.3.
Ok, I get it now - re-reading, you compared the original ABEX drawing to your clone. Dangerous. What datum/s did you choose?
 
Last edited:

J!m

Veteran and General Yakker
Joined
Dec 24, 2019
Messages
10,831
Location
Connecticut
Tagline
BOT
#9
I’m sure the main piece could be made from aluminum jig plate. And it could be Blanchard ground if needed. That small part would be flat within a few tenths easily.
 

J!m

Veteran and General Yakker
Joined
Dec 24, 2019
Messages
10,831
Location
Connecticut
Tagline
BOT
#13
A good machinist is mindful of the order of operations…

But jig plate is very flat and very stable. If thickness was right it could probably be used off the shelf and meet .002 across the corners of such a small piece. I think it is sold at .003/foot max deviation.

Bronze is another option. Easy to work and holds tolerance but honestly thousandths is not high precision. Another order of magnitude is. Four places not three.

I have done lapping on proper critical parts two helium light bands flatness. That’s high precision.
 

perfecious

New Around These Parts
Joined
Jan 25, 2023
Messages
3
#14
I guess, it would be interesting to check if the gauge matches the alignment after it was made with a proper one. At the end of the day, this is what matters, and often would be enough for most people (especially those that messed up their decks severely). Unless there is huge variety in the tolerances between different samples, which would... not be very helpful.
 
Joined
Jun 13, 2024
Messages
441
Location
Peoples Republic of Vleuten
#15
I guess, it would be interesting to check if the gauge matches the alignment after it was made with a proper one. At the end of the day, this is what matters, and often would be enough for most people (especially those that messed up their decks severely). Unless there is huge variety in the tolerances between different samples, which would... not be very helpful.
No, that would be considered bad practice imo. There are several factors that could preclude that from having a reliable outcome.
A good anaelogy would be to say that you take your car to be wheel-aligned by a known, decent and calibrated alignment system, then use the car to verify whether or not a different system used by a garage down the road is 'good' or not. You wouldn't.
You only ever use one datum point or one set of known constant factors in engineering, otherwise you introduce rogue elements and risks.

To be honest, I only use the M300 as a good basis to start calibration activities. The fine tuning is done with an oscilloscope, which is actually much more important and accurate for achieving specs. With the gauge you rely on sight-verification and the feeler gauge and then work forwards using a scope, especially for the head-azimuth and head-tilt angle variables.
The gauge flatness determines how well the gauge performs in adjusting the head tilt angle and this is where the Chinese gauges fall flat - they're all a country mile outside the flatness spec of the M300.
I could probably get a decent calibration achieved just using an oscilloscope but it could potentially be a hell of a lot more work and more difficult to achieve if the head has already been messed around with.
 
Last edited:

Makymak

Journeyman
Joined
Dec 6, 2021
Messages
224
Location
Where the sun meets the rocks and the sea
#16
I only use the M300 as a good basis to start calibration activities.
Exactly!

An M300 gauge (or equivalent) is only useful for reference when starting tape path calibration. In other words, for the starting point. The M300 gives the absolute geometry of the path but the actual is affected by some factors the M300 can't anticipate, eg: the condition of the rollers or the heads wear. I always give more value to a mirror tape and as @Chris Cables says, some measurements.
 
Joined
Jun 13, 2024
Messages
441
Location
Peoples Republic of Vleuten
#17
Exactly!

An M300 gauge (or equivalent) is only useful for reference when starting tape path calibration. In other words, for the starting point. The M300 gives the absolute geometry of the path but the actual is affected by some factors the M300 can't anticipate, eg: the condition of the rollers or the heads wear. I always give more value to a mirror tape and as @Chris Cables says, some measurements.
It's not quite accurate to say that the M300 will determine or verify the 'absolute geometry' of a tape-path as it's specifically only for component factors within the scope of that description, namely PB/REC head height, tilt and depth-penetration. But you're right to say it forms a good basis/start-point for everything else that should follow.

A mirror cassette will help to seek out any anomalies in the entire tape path and I used Nick 'Bohelco''s excellent mirror tape to discover a slightly bent-out tape-guide finger that was causing some issues on a Yamaha deck recently. I wouldn't necessarily have discovered that with the M300 gauge.
The relationship between the supply/take-up capstans and pinch rollers also requires a tension gauge to calibrate as well as adjusting the screw/pots to adjust position and resultant compression.
 
Last edited:

borchee

Journeyman
Joined
Aug 25, 2021
Messages
158
#18
Here's what appears to be original IT M300 specs - slightly different (because of the Philips cassette revision status it was made to?) to them stated in Audio magazine (whole article/product info attached).

Cassette head and guide gauge Information Terminals M300_manual_user_1968-10 rev. 4_en_tapehea...jpg

Cassette head and guide gauge Information Terminals M300_manual_user_1968-10 rev. 4_en_tapehea...jpg
 

Attachments

Last edited:
Joined
Jun 13, 2024
Messages
441
Location
Peoples Republic of Vleuten
#19
Yeah, that's what i refer to. In fact, did you give me these images via TH as they're exactly the same photos as I have, with the handwritten bit about Shirasuna mechs.
If so, thanks again, they came in really useful to determine the specs in my own RFQ.
;)
 
Top