Jer's 700B Quasi to Full Comp/Backplane Build

jbeckva

Admin/Server Dude MAA Guy
Staff member
Joined
Jun 11, 2010
Messages
6,853
Location
Powhatan, Virginia, United States
Tagline
WassupYa Mang?
#1
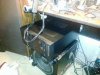
Been slacking a little bit, as I actually have had "the goods" all week, but here we go!

Going to take the 700B I bought from Dave, and give it the "BIG" makeover. Out comes the point to point wiring, in goes the backplanes. Converting to full complementary while we're at it. On the whole, fully rewiring including the last bit of BIG 1 x 1/4 copper buss bar. Hopefully soon I'll also swap in new caps (ey.. any word on the group buy lately? :mrgreen:).

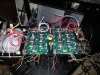
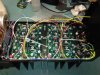
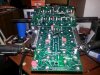
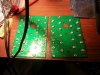
Here's the start of it.. almost done populating the backplanes, then we'll put the amp under the knife (cutters) and gut 'er....

20140314_215116.jpg

20140311_000926.jpg
 

NavLinear

Veteran and General Yakker
Joined
Apr 12, 2012
Messages
6,062
Location
SoCal
#3
Jer - caps are expected in mid April - 10 weeks after receipt of order. I'll PM you when they actually arrive.
 

jbeckva

Admin/Server Dude MAA Guy
Staff member
Joined
Jun 11, 2010
Messages
6,853
Location
Powhatan, Virginia, United States
Tagline
WassupYa Mang?
#6
Thanks Nav.. yeah I'll risk 'er with the Adcoms for now as they've been in use for awhile and haven't geyser'd on me LOL. Ron/Joe yeah man I am stoked... like my 400 full comp, only twice the power???!! Damn I'll bet this is going to be good when it's all done! Slow n steady tho... :smokin:
 

laatsch55

Administrator,
Staff member
Joined
Jan 14, 2011
Messages
75,023
Location
Gillette, Wyo.
Tagline
Halfbiass...Electron Herder and Backass Woof
#7
One thing about it Jer, as soon as you turn it on, it and you KNOW that there's enouigh headroom to handle most anything,,,,,,and that my friend is a VERY good thing!!
 

Gepetto

Administrator
Staff member
Joined
May 15, 2011
Messages
14,098
Location
Sterling, MA
Tagline
Old 'Arn Enthusiast
#8
Thanks Nav.. yeah I'll risk 'er with the Adcoms for now as they've been in use for awhile and haven't geyser'd on me LOL. Ron/Joe yeah man I am stoked... like my 400 full comp, only twice the power???!! Damn I'll bet this is going to be good when it's all done! Slow n steady tho... :smokin:
Yeah take your time and do it up right Jer. It's got to look as good on the inside as it sounds on the outside :)
 

jbeckva

Admin/Server Dude MAA Guy
Staff member
Joined
Jun 11, 2010
Messages
6,853
Location
Powhatan, Virginia, United States
Tagline
WassupYa Mang?
#9
One thing about it Jer, as soon as you turn it on, it and you KNOW that there's enouigh headroom to handle most anything,,,,,,and that my friend is a VERY good thing!!
No doubt!! But now.. gotta switch gears.. as this pic shows there's "something else" that needs finished up for a really good friend (wonder who??... heheh) :thumbright:

20140314_230452.jpg
 

orange

Veteran and General Yakker
Joined
Jul 6, 2010
Messages
17,704
Tagline
Broken beyond repair but highly affable
#14
I'm going over that with the friend I mentioned earlier...I have to get back to that now since he wanted me to try something.
 

jbeckva

Admin/Server Dude MAA Guy
Staff member
Joined
Jun 11, 2010
Messages
6,853
Location
Powhatan, Virginia, United States
Tagline
WassupYa Mang?
#17
Nice Jer. You are making great progress. It's not a sprint, it is a marathon...
That is definitely a spot-on description of this level of conversion, Joe. Geeze louise.. it is a lot of work, and I don't really think I'm halfway through yet LOL.

Getting the heatsinks on was "interesting". Thought I could push all the shoulder washers down from the top to "hold" the heatsinks while I mounted the PCB's and then just flip it over (very very carefully) to put a few screws in to secure 'em. Nope.. I think I got about a third into the "flip" when all 4 heatsinks fell off. So then I took it one at a time.. sort of two at a time. Had to keep pressure on the pcb from the bottom (now flipped over) while jimmy'ing the heatsink into position where it lined "perfectly" up with all 12 shoulders. Even then had to put a few screws in.. loosening a few here.. readjusting... tightening... Eventually got it tho!

Yeah it probably would have been much easier to oversize the holes on the heatsink like in the directions (RTFM eyup I know.. hehe). I might still do it as I wonder if when all outputs are "in", would I run into stress fractures on some of the shoulders.. eventually through use? The B and E holes are lined up perfectly tho...
 

Gepetto

Administrator
Staff member
Joined
May 15, 2011
Messages
14,098
Location
Sterling, MA
Tagline
Old 'Arn Enthusiast
#18
That is definitely a spot-on description of this level of conversion, Joe. Geeze louise.. it is a lot of work, and I don't really think I'm halfway through yet LOL.

Getting the heatsinks on was "interesting". Thought I could push all the shoulder washers down from the top to "hold" the heatsinks while I mounted the PCB's and then just flip it over (very very carefully) to put a few screws in to secure 'em. Nope.. I think I got about a third into the "flip" when all 4 heatsinks fell off. So then I took it one at a time.. sort of two at a time. Had to keep pressure on the pcb from the bottom (now flipped over) while jimmy'ing the heatsink into position where it lined "perfectly" up with all 12 shoulders. Even then had to put a few screws in.. loosening a few here.. readjusting... tightening... Eventually got it tho!

Yeah it probably would have been much easier to oversize the holes on the heatsink like in the directions (RTFM eyup I know.. hehe). I might still do it as I wonder if when all outputs are "in", would I run into stress fractures on some of the shoulders.. eventually through use? The B and E holes are lined up perfectly tho...
There is a trick to holding on the board allowing you to work from the outside. Put a large diameter nylon washer on the upper 1/4" post and put a #6 washer and nut on it to hold it in place. That way you can work from the outside with the flanges down on the bench. The board holds all the nylon shoulder washers in place. As you put on the heat sinks, then you put one screw with nylon washer on each diagonal corner to hold each in place. I think my earlier on line pictures show that for you Jer.
 

Gepetto

Administrator
Staff member
Joined
May 15, 2011
Messages
14,098
Location
Sterling, MA
Tagline
Old 'Arn Enthusiast
#19
PL700_2 013.jpg


You can see the trick in this picture Jer


That is definitely a spot-on description of this level of conversion, Joe. Geeze louise.. it is a lot of work, and I don't really think I'm halfway through yet LOL.

Getting the heatsinks on was "interesting". Thought I could push all the shoulder washers down from the top to "hold" the heatsinks while I mounted the PCB's and then just flip it over (very very carefully) to put a few screws in to secure 'em. Nope.. I think I got about a third into the "flip" when all 4 heatsinks fell off. So then I took it one at a time.. sort of two at a time. Had to keep pressure on the pcb from the bottom (now flipped over) while jimmy'ing the heatsink into position where it lined "perfectly" up with all 12 shoulders. Even then had to put a few screws in.. loosening a few here.. readjusting... tightening... Eventually got it tho!

Yeah it probably would have been much easier to oversize the holes on the heatsink like in the directions (RTFM eyup I know.. hehe). I might still do it as I wonder if when all outputs are "in", would I run into stress fractures on some of the shoulders.. eventually through use? The B and E holes are lined up perfectly tho...
 

Gepetto

Administrator
Staff member
Joined
May 15, 2011
Messages
14,098
Location
Sterling, MA
Tagline
Old 'Arn Enthusiast
#20
View attachment 12703


You can see the trick in this picture Jer
And the other trick is shown here Jer. Skipping the bottom slot allows you to install the pre-driver transistors for initial bring up while still having the heat sinks securely in place. You MUST use nylon washers to do that bring up trick. Otherwise you will just blow your rail fuses if you use metal washers.

PL700_2 011.jpg
 
Top