
Sony TC-K71 Debauchery
- Thread starter mr_rye89
- Start date

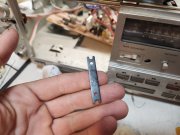
Probably right. Maybe a replacement ball from a bicycle shop.
The unit I'm rebuilding now has about 5 balls in plastic retainer tracks between the transports frame and head block, and a additional ball under a metal clip on the outside of the head block.
My metal clip is sprung to keep the head block tight against the transport frame when the solenoid lifts the head block.
The balls reduce friction of movement and the surface finish of the metal parts the balls contact is similar to a Teflon non stick fry pan.

I have a similar Sony TC-K75 which I rescued from dead.
Those blue plastic parts do crack, I had to Gorilla Glue the rear motor and flywheel plate supports. This repair game isn't for the impatient! ;o)
Not wishing to distract others, but if you permit, I'll put a link in to my blogger page. No worries if not.
Those blue plastic parts do crack, I had to Gorilla Glue the rear motor and flywheel plate supports. This repair game isn't for the impatient! ;o)
Not wishing to distract others, but if you permit, I'll put a link in to my blogger page. No worries if not.
From memory, I bought some bearings some time ago, 1.5mm, 2mm, and 2.5mm diameter. As George S suggests, my money will be on that it is either a 2mm or 2.5mm bearing. Luckily, I've not had to open up my TC-K75 at that part of the transport.
This aside, and I guess your TC-K71 is similar?, I'm not that impressed with the dual capstan system where either pinch roller compression doesn't appear to be adjustable?
This aside, and I guess your TC-K71 is similar?, I'm not that impressed with the dual capstan system where either pinch roller compression doesn't appear to be adjustable?
I have a similar Sony TC-K75 which I rescued from dead.
Those blue plastic parts do crack, I had to Gorilla Glue the rear motor and flywheel plate supports. This repair game isn't for the impatient! ;o)
Not wishing to distract others, but if you permit, I'll put a link in to my blogger page. No worries if not.
Those blue plastic parts do crack, I had to Gorilla Glue the rear motor and flywheel plate supports. This repair game isn't for the impatient! ;o)
Not wishing to distract others, but if you permit, I'll put a link in to my blogger page. No worries if not.
No worries, no bull**** here. ;o)
https://cassettedeckman.blogspot.com/2024/05/sony-tc-k75-cassette-deck.html
https://cassettedeckman.blogspot.com/2024/05/sony-tc-k75-cassette-deck.html
Great info! My TC-K71 looks identical mechanically. I think the K75 adds calibration tones and a ferrite+ferrite head instead of a Sendust+Ferrite head. I'm hoping to get away with just fixing the transport and replacing a few high ESR capacitors. This deck always sounded a bit dull but I think the head block has been loose the whole time I've had it.
I think they are identical. Once you've got it all back together, test with some 'disposable' tapes as dual capstan systems when they go wrong may crease/chew the tapes!?
Mine may still crease one particular tape (SONY HF) when it's feeling moody. I believe I know the source of the problem - I suspect the supply capstan/pinch contact line is not 'gripping' the tape sufficiently; on close inspection the tape sheet moving into the supply side can become a little buckled. Why?, well I believe the capstan/pinch traction line is insufficient and an increment of tape gets pulled under per millisecond - one half of the tape look tort, and the other is lagging behind. At some point probability takes over and for some tapes the tape gets re-directed (usually) away from the font side. You can actually see the tape at the supply guide beginning to 'run up' the guide, and then later being forced back into line.
I think more 'grippy' tapes are best; although the creasing can be stopped (for this SONY HF tape) if and when I apply more back tension. Currently back tension setting is at a maximum, and with a 'new' felt pad. Maybe I should try a thicker line of felt on the back tension break?
Otherwise the deck is super dooper!
The old pinch rollers have been 'sanded', which has resulted in making tape creasing almost non-existent. However, if I were to sell this deck, I will have to make sure tape crease is very improbable.
Dual capstan decks are great, until they’re not…
Besides tension, alignment is also critical. The two captains need to be parallel to each other and perpendicular to the tape path. Stamped steel frame work is often not very perfect…
Increasing back tension further could stall the motor or break the tape. Don’t try to fix one problem by creating another one.
Thanks for the replies. And apologies if I am distracting attention away from the original post, but it is relevant.
The additional back tension is very small, but while it fixes the 'SONY HF' problem, increasing back tension isn't the solution.
Of interest - I have noticed with this transport (and the TC-K71/81) that the pinch roller pressure is not variable; that is - I don't have (say) 3 setting at my disposal. I also need to get some new pinch rollers for this machine. I am confident 99% of the time all is good, but I'm aiming for > 99.99%.
Also, and not unrelated I have noticed that the supply guide is not as wide as found on other machines? When I adjusted the said guide so that the tape runs dead centre, there very little 'play' either side before the tape would theoretically 'rub' against the wall. Unfortunately I don't have another TC-K71/81/75 etc to compare.
Oh the joys of fixing a dual capstan machine! ;-)")
The additional back tension is very small, but while it fixes the 'SONY HF' problem, increasing back tension isn't the solution.
Of interest - I have noticed with this transport (and the TC-K71/81) that the pinch roller pressure is not variable; that is - I don't have (say) 3 setting at my disposal. I also need to get some new pinch rollers for this machine. I am confident 99% of the time all is good, but I'm aiming for > 99.99%.
Also, and not unrelated I have noticed that the supply guide is not as wide as found on other machines? When I adjusted the said guide so that the tape runs dead centre, there very little 'play' either side before the tape would theoretically 'rub' against the wall. Unfortunately I don't have another TC-K71/81/75 etc to compare.
Oh the joys of fixing a dual capstan machine!
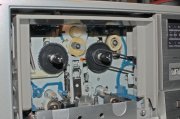
There' something I forgot to mention earlier concerning tape creasing, and it is this - the take-up reel tension is high, too high in my opinion. I have cleaned the said idler many times but the traction remains excessive. So yes, a new idler tyre is needed, but late this afternoon, I thought I'd try something I have been pondering over for a while. Effectively 'wetting' the take-up rubber idler with some silicone grease!
Result: tape creasing gone, even on the most sensitive and thin C120 tapes. After 30 minutes of play, all is trouble free on the SONY HF troublesome tape, at either ends. And as an added bonus wow/flutter has dropped to between 0.03xx ... 0.050x. Yes, the speed is a little fast, I can alter that later.
Let's see how long this lasts. However, even though this appears to be a 'fix', I still believe the pinch rollers need to be renewed, and of course the take-up idler.
I thought I'd post this to you Mr_Rye89, since we both have essentially the same transport.
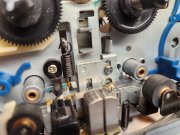
Jim, perhaps I may not have been clear enough, but the 'wetting' (more like dampening) of the rubber idler (via Q-tip) is that very rubber idler in the top right hand corner.
In PLAY mode shown here, the brass driver is driving (and part slipping with) the idler, but now there is less friction between the two, which is what is required. I was initially surprised to find that this old rubber idler had so much friction when in contact with the brass driver. BTW, I'm certain it is supposed to slip during PLAY between the two.
In PLAY mode shown here, the brass driver is driving (and part slipping with) the idler, but now there is less friction between the two, which is what is required. I was initially surprised to find that this old rubber idler had so much friction when in contact with the brass driver. BTW, I'm certain it is supposed to slip during PLAY between the two.