
You are using an out of date browser. It may not display this or other websites correctly.
You should upgrade or use an alternative browser.
You should upgrade or use an alternative browser.
PL 300 S2
- Thread starter George S.
- Start date
e30m3mon
Chief Journeyman
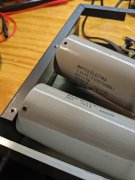
And you thought the two-sided foam tape or glue were bad ideas for mounting the caps!
Well you had to replace those anyway! 1979 date code?
Well you had to replace those anyway! 1979 date code?
Yup, Al. 19th week. I checked the length of all case screws. No shorties. So evidently pierced at birth.
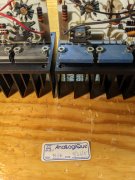
Repair tag inside from AnaLLogiQue. Repair shop in NYC from my search. I suppose "Nick" could have screwed the pooch 09/26/86. But, all screws look original and long.
Guy I bought it from said it would start to "cut out" until he rapped on the chassis. Think we've solved that issue! I like the double sided tape better!
Attachments

20tajk7
Chief Journeyman
- Joined
- Jul 26, 2011
- Messages
- 1,037
- Location
- Absurdy, new name of France
- Tagline
- You never have too much tapedecks ^^
I've destroyed a solenoid of a Luxman cassette deck the same way.
Yup, just friggin brilliant...Starting on the amp rebuild. Factory defect? Joe has commented many times about the engineering of these amps and where they put the chassis screws. F**k!
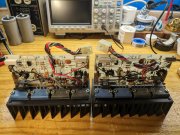
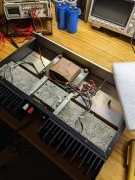
The speaker protection relay board. Three electrolytics on it. One on each amp module, then the storage caps. Seven total.
Overall, good shape.
While back I brought it up slow on the Variac and DBT, no excessive DC on the outputs, so I put it away for a while.
Now going to order caps and tomorrow I'll go over the modules with the DER EE and Sencore.
Overall, good shape.
While back I brought it up slow on the Variac and DBT, no excessive DC on the outputs, so I put it away for a while.
Now going to order caps and tomorrow I'll go over the modules with the DER EE and Sencore.
Attachments
Bean counter mode was fully entrenched at PL by the time they introduced the PL200-300 S2 amps.
And the PL200 S1 deserves to just be stepped on...
And the PL200 S1 deserves to just be stepped on...
Yup, easy to do, especially when upgrading these old PL amps using the original chassis.I've destroyed a solenoid of a Luxman cassette deck the same way.
I'll fill those problem screw holes in the chassis by cross threading in another screw, cut it flush on both sides with a Dremel cutting wheel, then stake it with a center punch. The plug will never move.
Then drill new screw holes where appropriate. Had to do this on the 700 Pro I WOPL'ed using the original heavy steel chassis.
- Joined
- Jan 14, 2011
- Messages
- 75,509
- Location
- Gillette, Wyo.
- Tagline
- Halfbiass...Electron Herder and Backass Woof
And for all its shortcomings, the 300's sound surprisingly good...
Agree Lee, I had a PL200 S2 for a while that I had to totally rebuild. Both boards were zorched. Once repaired it was a pleasing sounding ampAnd for all its shortcomings, the 300's sound surprisingly good...
") Ordered caps for it today. I'm thinking it'll drive two little tweeters quite well!
Ordered caps for it today. I'm thinking it'll drive two little tweeters quite well!- Joined
- Jan 14, 2011
- Messages
- 75,509
- Location
- Gillette, Wyo.
- Tagline
- Halfbiass...Electron Herder and Backass Woof
Yep, the modules were quite handy. Same idea Pioneer had on the Spec 2. Easy to work on..
- Joined
- Jan 14, 2011
- Messages
- 75,509
- Location
- Gillette, Wyo.
- Tagline
- Halfbiass...Electron Herder and Backass Woof
Agree Lee, I had a PL200 S2 for a while that I had to totally rebuild. Both boards were zorched. Once repaired it was a pleasing sounding amp
Stephen in Phoenix had a 300 running the mids and tweets in his Infinity 4.5's...and they sounded really good.
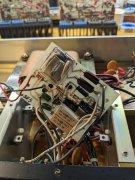
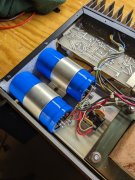
Got the new caps installed on the boards and all the old flux off and they look good. Found the left channel drivers and finals show signs of replacement or resoldering, guess that's why it went into the shop in 86.
Going to walk the dog, then cut the styrene foam to space out the storage caps so they never get "screwed" again.
Going to walk the dog, then cut the styrene foam to space out the storage caps so they never get "screwed" again.
Attachments
Last edited:
- Joined
- Jan 14, 2011
- Messages
- 75,509
- Location
- Gillette, Wyo.
- Tagline
- Halfbiass...Electron Herder and Backass Woof
That looks good George...what caps went back in?
Cornell Dubilier storage caps, and the axial's for the relay board. Nichicon UKZ Muse for the lone radial, on the amp module.
The CDI storage caps are marked Mallory USA.
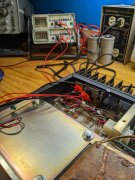
Adjusting the bias. Manual says .35 to .45 VDC. Shooting for the midpoint after amp temp stabilizes at idle.
Each module has two resistors that are test points. Leads go on each side of resistor and voltage drop is measured.
Also, each fuse was incorrect, tracked down the exact correct ones and installed them before bringing it up
The CDI storage caps are marked Mallory USA.
Adjusting the bias. Manual says .35 to .45 VDC. Shooting for the midpoint after amp temp stabilizes at idle.
Each module has two resistors that are test points. Leads go on each side of resistor and voltage drop is measured.
Also, each fuse was incorrect, tracked down the exact correct ones and installed them before bringing it up
Attachments
Last edited: