Skywavebe
Chief Journeyman
Hello Friends,
This time, I came across a repair of a Teac A3440 deck known to be dead and what was said to be a open Primary in a transformer. It was correct. This post if followed correctly will allow you to fix a Teac transformer that has the internal fuse burned out in it that otherwise would require a new transformer. I feel that I should educate rather than have to do them all myself or have good transformers going in the can when this simple procedure will in most cases provide for a fix that worked so far 100% of the time for me.
Pictures of the transformer will be provided as space allows. Steps as follows-
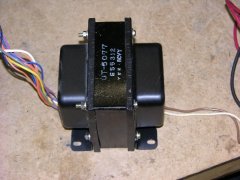
1) Remove Transformer from rear having removed rear panel. Fours screws Philips type.
[attachment=2:33c9sf0k]DSCN3654s.jpg[/attachment:33c9sf0k]
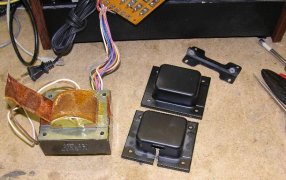
2) Cut clear wire ties from cables to allow you to work on the transformer with deck in front of you.
Take the 4 screws out of transformer where 7mm metric nut driver and Philips driver were used. Keep track of how the transformer is put together- label bottom with a sharpie on the black core of the transformer where the feet go.
[attachment=1:33c9sf0k]DSCN3655s.jpg[/attachment:33c9sf0k]
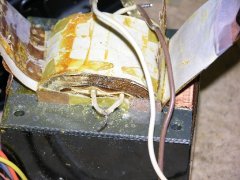
3)With both black case covers off, use a small screwdriver to pry away from the coil section the copper strap material so that you can cut through it with tin snips not at the edge but about 1/2 inch from the edge of the transformer so in case you want to put it back together with solder.
[attachment=0:33c9sf0k]DSCN3656s.jpg[/attachment:33c9sf0k]
4) Carefully cut layers of paper and plastic insulation material near center of coil to gain access to the wires that are below. You will not be cutting near to the enamel transformer windings- they are deep into the transformer further yet.
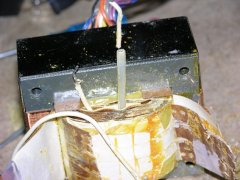
5) Once you locate the wires- I had three white wires and this is how they are arranged connection wise with wires from outside. Two wires went into the transformer one white and one brown. In the transformer there are three wires- the white wire from the outside in this case got left alone. The brown wire went to the input of the fuse and the fuse link came out (output side) the other side of the winding and was twist and soldered to the actual primary wire of the transformer also white. This may be the time to determine if the transformer can be repaired- Ohm out the original white outside wire TO the Output white wire of the fuse- in every case there was conduction for me in the double digits.
See next post for these pictures-
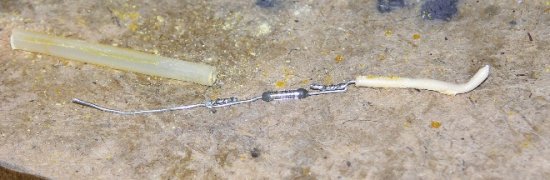
6) This is where the recover of the fuse is made as a burned out fuse in the transformer only takes up space. Using a small flat screw driver it is possible to knock out and remove the plastic tube and fuse from the transformer. I took it out and looked at it with a magnifier- it said 125V at 2 Amps and it was open.
7) Repair- solder the original brown wire to the Output side white wire of the fuse or where the output of the fuse was connected. Now you have bypassed the fuse link. I use heat shrink tubing to isolate all the connections I make. Now start to put the layers lack onto the coil section and tape down using either packing tape or electrical tape just to hold it in place- at end I use the square edge of pliers to get the copper sheet back into place at edge of the coil and lamination section and tape down to lamination section.
Now start to assemble the outer covers back onto the transformer and make sure all screws are facing the same way and the longer screws go into the bottom section where the additional thickness of the feet are located. Once you have the thing back together there is one more step to replace the fuse that was in the transformer- I placed an in line 2 Amp fuse holder in cutting the brown wire and placing it in series with that line. This needs to be tucked away and soldered ends heat shrink applied but pretty much you have take the fuse out of the internals of the transformer and placed it on the outside in this new holder. Remount the transformer the way it was and if you do a neat job the only way one can tell this was done is by observation of the fuse holder. This should work on all models of Teac decks- I am sure I did it on at least 4 different ones.
If you have any additional questions you know where to find me.
This time, I came across a repair of a Teac A3440 deck known to be dead and what was said to be a open Primary in a transformer. It was correct. This post if followed correctly will allow you to fix a Teac transformer that has the internal fuse burned out in it that otherwise would require a new transformer. I feel that I should educate rather than have to do them all myself or have good transformers going in the can when this simple procedure will in most cases provide for a fix that worked so far 100% of the time for me.
Pictures of the transformer will be provided as space allows. Steps as follows-
1) Remove Transformer from rear having removed rear panel. Fours screws Philips type.
[attachment=2:33c9sf0k]DSCN3654s.jpg[/attachment:33c9sf0k]
2) Cut clear wire ties from cables to allow you to work on the transformer with deck in front of you.
Take the 4 screws out of transformer where 7mm metric nut driver and Philips driver were used. Keep track of how the transformer is put together- label bottom with a sharpie on the black core of the transformer where the feet go.
[attachment=1:33c9sf0k]DSCN3655s.jpg[/attachment:33c9sf0k]
3)With both black case covers off, use a small screwdriver to pry away from the coil section the copper strap material so that you can cut through it with tin snips not at the edge but about 1/2 inch from the edge of the transformer so in case you want to put it back together with solder.
[attachment=0:33c9sf0k]DSCN3656s.jpg[/attachment:33c9sf0k]
4) Carefully cut layers of paper and plastic insulation material near center of coil to gain access to the wires that are below. You will not be cutting near to the enamel transformer windings- they are deep into the transformer further yet.
5) Once you locate the wires- I had three white wires and this is how they are arranged connection wise with wires from outside. Two wires went into the transformer one white and one brown. In the transformer there are three wires- the white wire from the outside in this case got left alone. The brown wire went to the input of the fuse and the fuse link came out (output side) the other side of the winding and was twist and soldered to the actual primary wire of the transformer also white. This may be the time to determine if the transformer can be repaired- Ohm out the original white outside wire TO the Output white wire of the fuse- in every case there was conduction for me in the double digits.
See next post for these pictures-
6) This is where the recover of the fuse is made as a burned out fuse in the transformer only takes up space. Using a small flat screw driver it is possible to knock out and remove the plastic tube and fuse from the transformer. I took it out and looked at it with a magnifier- it said 125V at 2 Amps and it was open.
7) Repair- solder the original brown wire to the Output side white wire of the fuse or where the output of the fuse was connected. Now you have bypassed the fuse link. I use heat shrink tubing to isolate all the connections I make. Now start to put the layers lack onto the coil section and tape down using either packing tape or electrical tape just to hold it in place- at end I use the square edge of pliers to get the copper sheet back into place at edge of the coil and lamination section and tape down to lamination section.
Now start to assemble the outer covers back onto the transformer and make sure all screws are facing the same way and the longer screws go into the bottom section where the additional thickness of the feet are located. Once you have the thing back together there is one more step to replace the fuse that was in the transformer- I placed an in line 2 Amp fuse holder in cutting the brown wire and placing it in series with that line. This needs to be tucked away and soldered ends heat shrink applied but pretty much you have take the fuse out of the internals of the transformer and placed it on the outside in this new holder. Remount the transformer the way it was and if you do a neat job the only way one can tell this was done is by observation of the fuse holder. This should work on all models of Teac decks- I am sure I did it on at least 4 different ones.
If you have any additional questions you know where to find me.