NAD 1300 preamp upgrades

J!m

Veteran and General Yakker
Joined
Dec 24, 2019
Messages
11,822
Location
Connecticut
Tagline
BOT
#1
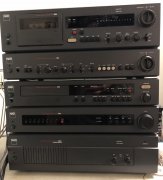
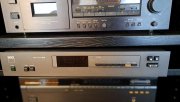
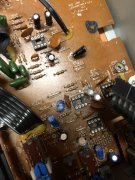
The 1300 is a well-regarded preamp in stock trim. however, it's rather upgrade-friendly with a standard OpAmp (collection) for amplification. Nine of them in fact.

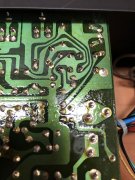
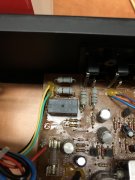
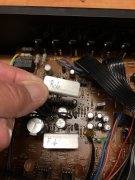
And they're crappy (by today's standards) NJM 2043's. We will replace these with Ti LM4562 OpAmps. Every published parameter is better, but noteable is CMRR at 120dB V 100dB; Slew rate of 20v/mS v 6v/mS. They are clean, fast and quiet. Pinout is the same, but supply voltage is a bit lower. I'm installing sockets while I'm doing the job in the unlikely event a better OpAmp is developed in my lifetime.

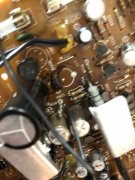
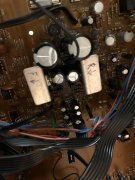
To do this, a couple Zener Diodes have to be changed from 20V to 17V. I'm replacing the power supply caps with higher voltage Panasonic electrolytics while I'm in the area. I'm not doing a full recap as it's unnecessary, and I want to study the schematic (attached) further and decide where I can use films in any audio areas. Plus, it's generally a good idea to limit the number of changes you make between testing; in case you screw something up...

Basically, taking a perfectly good preamp, and cutting it up.
 

Attachments

J!m

Veteran and General Yakker
Joined
Dec 24, 2019
Messages
11,822
Location
Connecticut
Tagline
BOT
#5
A better looking tape deck and floppy tonearm turntable still inbound…

This gray paint is really tricky to clean. Rub it too much and it glosses up. It’s matte and holds the finger oil but too much alcohol and it starts taking paint off. The red and white printing seems durable enough but the black is fragile. The tape deck and CD player both have some black on the gray and you have to be super careful.

I ended up repainting the cover for the tape deck and it’s not quite dark enough. But it’s better than the black over rust that was.
 

62vauxhall

Veteran and General Yakker
Joined
May 14, 2014
Messages
2,348
Location
Southwest Kootenays BC
Tagline
No such things as bad days, just bad moments
#7
In the early '70's a friend going to university was involved with putting a mens floor hockey team together. There was already a women's team. His suggestion for the team's name was the Nads.

The objective being that if the men's team ever played the women's team, men's team supporters would get to cheer them on with "Go Nads, go".
 

marcok

Chief Journeyman
Joined
Jun 9, 2014
Messages
1,079
Location
Milan Italy
Tagline
I'm very curious about any tech item
#9
A better looking tape deck and floppy tonearm turntable still inbound…

This gray paint is really tricky to clean. Rub it too much and it glosses up. It’s matte and holds the finger oil but too much alcohol and it starts taking paint off. The red and white printing seems durable enough but the black is fragile. The tape deck and CD player both have some black on the gray and you have to be super careful.

I ended up repainting the cover for the tape deck and it’s not quite dark enough. But it’s better than the black over rust that was.
https://www.amazon.com/Birchwood-Ca...026688&sprefix=birchwood+,aps,237&sr=8-2&th=1
This product is perfect for NADs . Tested on my 4150 tuner .
Ciao
Marco
 

marcok

Chief Journeyman
Joined
Jun 9, 2014
Messages
1,079
Location
Milan Italy
Tagline
I'm very curious about any tech item
#11
Pics are useless now ; I have no pics before treatment . Sorry .
Anyway there were little scretchs on the edges of the face plate .
Now I remember that I used this product on Tandberg TCD 320 ( black front )
Ciao
Marco
 

J!m

Veteran and General Yakker
Joined
Dec 24, 2019
Messages
11,822
Location
Connecticut
Tagline
BOT
#14
Finally getting to this today.

Power supply almost done- recap (all raised voltage) and lower voltage zeeners. Found one voltage regulator looking hot (well, the board did) and saw the pad had lifted and was basically floating all three legs there... Pulled that, cleaned, fluxed and re-installed. The lifted middle pad bridged to a big resistor on the solder side, so I was able to make that connection sound electrically, but it's not attached to the board at the regulator... I might have replaced it if I had noticed it before, but I never exposed the solder side of the board when I was building my BOM.

Anyway, it was working before; it should still work with better connections now.

I also replaced the relay. Again, old was fine, but "while I'm in there" kinda stuff.

Once I finish these last couple caps, I scrub clean (boards were not cleaned well at the factory) and move onto the opamps removal and socket install.
 

J!m

Veteran and General Yakker
Joined
Dec 24, 2019
Messages
11,822
Location
Connecticut
Tagline
BOT
#15
Done except for putting the op amps in their sockets. Verified 32v on all sockets (+/- 16v) near the top of the range but good. I’ll button it up after I eat something.

IMG_2840.jpeg IMG_2841.jpeg IMG_2842.jpeg IMG_2843.jpeg IMG_2844.jpeg IMG_2846.jpeg IMG_2847.jpeg IMG_2848.jpeg
I had to do a few trace repairs on the last couple sockets. Overall pretty easy to work on. Board stayed in the box the whole time- bottom cover comes off for access. Very nice!
 

J!m

Veteran and General Yakker
Joined
Dec 24, 2019
Messages
11,822
Location
Connecticut
Tagline
BOT
#19
I'm baffled!

So, toggling up or down on the "Monitor" switch overrides any of the other input selectors?
On the preamp? Monitor of tape 1 or 2 (for playback). Turn that off if you want another source (CD, Tuna, LP...)

Other switch is for dubbing tape to tape. Pretty typical I thought, no?
 

Vintage 700b

Chief Journeyman
Joined
Mar 13, 2019
Messages
970
Location
Wisconsin
Tagline
Fabricator
#20
I've recapped and reworked (2) NAD 1020 pre's and while easy to access and work on, the traces were as fragile as eggs.
A little to much heat and they vaporize. Once done, they really do sound great. Great phono section.
This 1300 looks like it's coming along nicely Jim.
 
Top