
I have been wanting to do a blurb or two on some soldering tricks that will ensure that your builds, NO MATTER WHAT THEY ARE, will be of the best quality and hopefully outlive us all. I am by no means the best Iron Handler in the nation but I remember enough from school and Recertification (IPC-610-620) that I can pass on a trick or two. Yes, you may see a defect or two but this board is not being launched off of an aircraft carrier or heading for Uranus.....
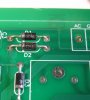
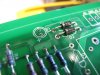
I wanted to show a technique for soldering in diodes and while it is a bit of a pain and time consuming, try it, The heat will not necessarily kill these components right away, it WILL shorten their life considerably. The "roach Clip Thingies" are called Little Joe's and a pack of them is a buck or two. Well worth it. THEY KEEP THE HEAT OFF THE COMPONENT, A HEAT SINK, SO TO SPEAK.
After you have your components formed and inserted into the board, then the fun begins. The residue is the "No Clean" flux. Don't let the name fool you. You need to clean it off but it is not as big of a pain in the ass as using the RMA flux (smells like pine trees). The RMA is easy to solder with but almost impossible to clean off.
Next I flip the board over and put a gentle clinch on the leads to keep the component from falling out. The military would not let you do this but hey, I'm retired....
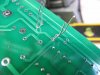
Put your "Little Joe's" on one side (or both sides and you can solder both ends at once), and ensure the components are in position. don't solder on this side of the board unless necessary
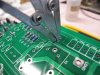
Solder and trim ON THE SOLDER SIDE OF THE BOARD. Sometimes I may cheat and tack components in on the silkscreen side but not an active component (transistor, diode etc...) The heat kills.
Then switch the Little Joe's to the other side of the component and repeat. Trim and clean.
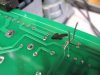
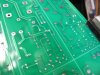
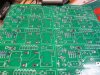
Don't worry about the silk screened side of the board!!!! The solder joint may not come all the way through to the component and may look cold or "DEWETTED" but the important side is the solder side of the board. The Little Joes wick heat away from the component (that's what we want right???) and the Quality inspection will mainly be on the back of the board. Look for a nice smooth concave fillet, no dewetting, no pits, NO BLOBS. You can actually put a little more heat to the joint since the little joe is protecting the diode. Final cleaning and trimming can now be performed. If you go and reflow that cold appearing joint, you just screwed up the project. This IS an acceptable joint (it's the other side which is the mechanical connection and is most important. (Remember, heat kills!!!!!).
The pic below.....THIS IS WHERE "THE RUBBER MEETS THE ROAD" GUYS AND GALS..... No blobs no hit's no errors.... clean and trim, and repeat, and then clean again. if you are using the amber colored flux (RMA) clean it again... you got to get that stuff off. it can hold moisture and is mildly corrosive
And with that, you should be good to move on to the other 20 DCP's or whatever you may be building. Learn to use the No Clean Fluxes. They work and once you are used to it, piece of cake. The RMA flux has it's place. The old shit like the transformers and the buss bars need more heat (850 degrees and 2 irons) and are a pain to tin (getting the initial small layer of solder on so the solder will flow so you have a good joint (stop Ron....)
If you see problems with this set of tips, start a thread on craigslist or something....
")
Perry